Setting data sources
Published 10 December 2025
When you create a new comparison project, SQL Compare requires information about which two data sources you want to compare, and how to connect to them. You specify this information on the Project Configuration dialog box:

Selecting data sources
Specify the two data sources you want to compare in the Data Sources tab. You specify a source and a target.
The source is the data source that will not change. The target is the data source that will change.
To switch the source and target, click 
You can compare the following types of data source:
- Database
A database you can connect to on a SQL Server. You will need to enter connection details.
If you want to compare Oracle databases, see: Schema Compare for Oracle - Backup
Native SQL Server backups or Redgate SQL Backup backups. You can specify a backup as a data source only if you are using SQL Compare Professional edition.
For more information, see: Working with backups. - Snapshot
A file produced by SQL Compare that contains information about the structure of a database.
For more information, see: Working with snapshots. - Scripts folder
A folder containing the SQL creation script files that collectively define the database structure. This is usually organized into a number of subfolders.
For more information, see: Working with scripts folders.
You can specify Scripts folder as a data source only if you are using SQL Compare Professional edition. - SQL Source Control
A revision of a database from a SQL Source Control repository.
For more information on getting your database into source control, see: SQL Source Control documentation.
You can specify SQL Source Control as a data source only if you are using SQL Compare Professional edition. - SQL Change Automation
The state represented by the Offline Schema Model and Programmable Objects in a SQL Change Automation project.
For more information on using SQL Change Automation projects, see: Working with SQL Change Automation projects.
You can specify SQL Change Automation as a data source only if you are using SQL Compare Professional edition.
You can compare any combination of data source types in your project.
If you select a snapshot or a backup as the target, the snapshot file or backup will not be modified. Instead, a deployment script is generated to modify the database from which the snapshot or backup was made.
If you select a scripts folder as the target, you can choose to modify those script files directly during deployment, or to create a deployment script to modify the database from which the scripts folder was created.
Selecting a database
- Under Source or Target, select Database.
- Type or select the name of the SQL Server in the Server box.
If you have problems selecting a SQL Server that is not running on the LAN, for example if you are accessing the SQL Server via an Internet connection, you may need to create an alias to the SQL Server using TCP/IP (refer to your SQL Server documentation for details). You can then type the alias name in the Server box to connect to the remote SQL Server.
To refresh the Server list, right-click the box and click Refresh, or scroll to the top of the list and click Refresh. - Select the authentication method, and for SQL Server authentication enter the User name and Password.
If you want SQL Compare to remember your password, select the Save password check box. - In the Database box, type or select the name of the database.
If you want to create a new database, at the top of the database list, click Create Database. For full details, see: Creating a new database.
To refresh the Database list, right-click the box and click Refresh, or scroll to the top of the list and click Refresh.
Selecting a backup
- Under Source or Target, select Backup.
- Click Add backup set files to select all the files making up the backup set you want to compare.
To specify a network path, type the full path, including the server name, for example:
\\ServerName\MyFolder\MyFile
If any of the files you add are encrypted, the Decrypt backup files dialog box is displayed. Enter the password to decrypt these files.
To use a differential backup as a data source, you must also add the associated full backup.
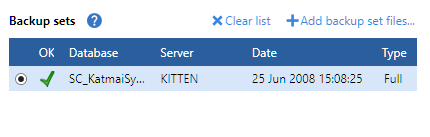
When you have added a backup set, one of the following icons is displayed:
| The backup set is valid and complete. |
| The backup set you have selected cannot be used as a data source. |
| One or more files in the backup set is encrypted. |
| Either the backup set is incomplete, or a differential backup has been added without the corresponding full backup. |
Selecting a SQL Compare snapshot
- Under Source or Target, select Snapshot.
- In the Snapshot box, select the name of the snapshot, or click
 to browse to the snapshot file.
SQL Compare displays information about the database from which the snapshot was created.
Selecting a scripts folder
- Under Source or Target, select Scripts folder.
- In the Scripts Folder box, select the folder, or click to browse to the folder.
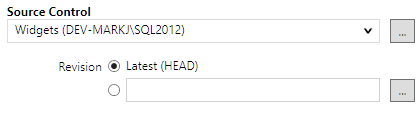
Selecting a version from SQL Source Control
- Under Source or Target, select SQL Source Control
- In the Repository box, select a database linked to SQL Source Control, or click <Browse source control...> to specify a repository URL.
- In the Version box, select a specific version from the source control history, or select the latest version:
This documentation contains proprietary information and is protected by copyright law.
Copyright © 2026 Red Gate Software Limited. All rights reserved


