Customizing the diagram
Published 28 August 2014
Once you've made a diagram, and you understand what it means, you may want to customize the diagram. This page covers how you can change how the diagram looks and what's in it.
Changing how the diagram looks
Moving objects around
You can rearrange the diagram by moving the objects. To do this, click on an object and drag it.
To move multiple objects, select the objects, then click on one of the objects and drag it.
To undo your changes and go back to the original layout, click ![]() Reapply Layout.
Reapply Layout.
Changing the layout
To change the layout of the whole diagram, choose one of these layout options:
- Circular lays the objects out to form the boundaries of circles, with connections that cross the centre of the circle
- Hierarchic organizes the objects in a hierarchical structure, where objects are placed in tiers above the objects they reference.
- Orthogonal places objects so that the lines between objects are as close to vertical and horizontal as possible.
- Smart Organic links objects into sets of clouds or lattices.
- Balloon Tree groups related objects together in balloon-like clusters.
This is the default layout.
Contents
For help choosing between the layout options, see Choosing between layouts.
Change the layout using the Layout box on the toolbar: ![]()
When you add objects to the diagram, they're automatically arranged into the current layout.
If you've hidden or moved any objects, you can redraw the diagram with this layout by clicking ![]() Reapply Layout.
Reapply Layout.
Changing object colors
To change the color of objects:
- Select the objects that you want to change.
- Right-click one of the selected objects, and select Properties.
- In the Object Properties dialog, click Fill Color or Text Color, and use the Color selector to choose a color.
Click OK on the Color selector.
You can go back to the default color by clicking Reset.- Click Close.
To go back to the default color:
- Select the objects that you want to change back.
- Right-click one of the selected objects, and select Properties.
Click Reset for the fill or text color.
- Click Close.
Seeing more details about objects
From the View menu, you can add to the diagram:
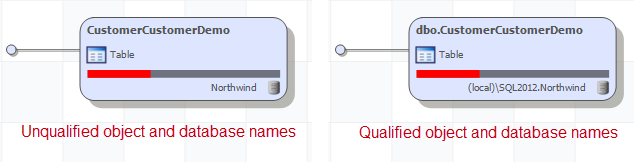
- qualified names for objects and databases ( View > Qualify Names > Object Names or Database names )
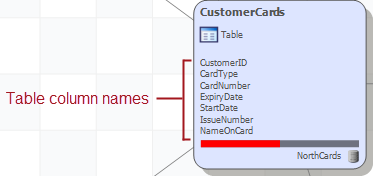
- table column names ( View > Table Column Names )
- relative importance bars, which show how many other objects use the object, taking dependencies at all levels into account ( View >
 Relative Importance Bars )
To find out more about an individual object, see Finding out more about an object.
Changing what's in the diagram
Updating the diagram when the database changes
Objects in the diagram stay as they were at the time you added them; they don't update when database they came from changes.
If the database changes, and you want the diagram to reflect the current state of the database, on the toolbar, click ![]() Update from Schema.
Update from Schema.
Resolving dependencies
If the diagram shows stalks or unresolved dependencies, you may be able to add these missing objects to the diagram. See Dealing with missing objects and Dealing with unresolved internal and external references.
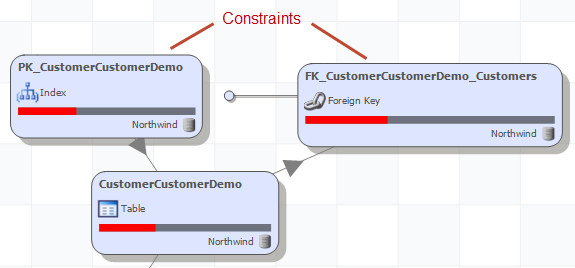
Showing constraints as objects
By default, constraints aren't shown as separate objects in the diagram. To change this, on the toolbar, click ![]() Constraints as Objects.
Constraints as Objects.
Show filegroups and system object dependencies
By default, filegroup and system object dependencies aren't shown in the diagram. This is because these dependencies can make the diagram very complex.
To see these dependencies on the diagram, on the toolbar, click ![]() Filegroup and System Object Dependencies.
Filegroup and System Object Dependencies.
Hiding and showing objects
If you want to temporarily remove an object from the diagram, you can hide it.
To hide objects:
- select the objects, then either:
- on the toolbar, click
 Hide
Hide - in the diagram, right-click one of the selected objects and click
 Hide
Hide
- on the toolbar, click
- in the Objects in Project pane, clear the checkbox next to the object you want to hide
To make an object visible again:
- In the Objects in Project pane, find the object you want to make visible.
- Select the checkbox next to the object.
To show all hidden objects, on the toolbar, click ![]() Show Hidden.
Show Hidden.
Removing objects
If you want to remove objects from the diagram permanently:
- Select the objects you want to remove.
- On the toolbar, click
 Remove from Project, or right-click a selected object, and click Remove from Project.
If you only want to remove objects from the diagram temporarily, hide the objects instead.
This documentation contains proprietary information and is protected by copyright law.
Copyright © 2026 Red Gate Software Limited. All rights reserved


