Printing the diagram
Published 28 August 2014
When you print the diagram, the entire diagram is printed with all currently visible objects and the current layout.
The printed diagram doesn't show the selected objects in different colors. If you want to print a diagram with selected objects in color, export the diagram to PDF, then print the PDF file.
To print the diagram, on the toolbar, click ![]() Print.
Print.
Changing the number of pages and layout
The Print dialog box displays the diagram on a grid. showing how objects will be laid out on the printed pages. Each box on the grid indicates a page. If a page doesn't have any objects or connections on it, that page is grayed-out, and won't be printed.
You can change the number and layout of pages:
- Change the number of pages the diagram is printed on under Print Size, using the Increase and Decrease buttons.
- Change where the page breaks are by switching between Portrait and Landscape page layouts.
If you want to move objects around (for example, so they aren't split over two pages), close the Print dialog box, then click and drag the objects on the diagram.
To see how the objects will look on the page, click Full Size Print Preview. This shows the diagram exactly as it will be printed, including page breaks.
Assembling the printed diagram
When you print over multiple pages, to help you assemble the printed diagram, each page has a layout indicator (in the format row number,column number) in the lower left corner.
Below, red numbers have been added to show the layout indicator numbers:
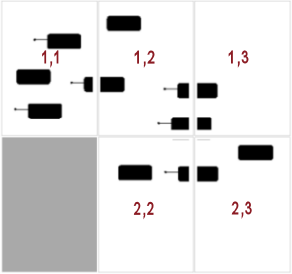
There aren't any objects on the lower left page (2,1), so it's grayed out, and won't be printed.
This documentation contains proprietary information and is protected by copyright law.
Copyright © 2026 Red Gate Software Limited. All rights reserved


