Starting up SQL Monitor for the first time
Published 17 August 2020
After you've installed SQL Monitor for the first time:
1. Open the SQL Monitor web interface.
- If you installed the SQL Monitor Web Server, it opens in your default browser at http://<machine name>.domain:8080/ or http://127.0.0.1:8080/.
- If you configured your own Web Server using IIS, open the SQL Monitor website you configured.
If SQL Monitor is installed locally, you can also launch it by selecting Red Gate > SQL Monitor from the Start menu, or entering the URL http://<webserver>:<portnumber> (e.g. http://mymachine:8080). If SQL Monitor is installed on a different domain or subdomain, use the fully qualified machine name: http://<webserver>.<domain>.com:<portnumber>.
2. Create the SQL Monitor Administrator Role.
- To start using SQL Monitor, you need to create the Administrator role in the SQL Monitor UI, by supplying a password for the administrator account:
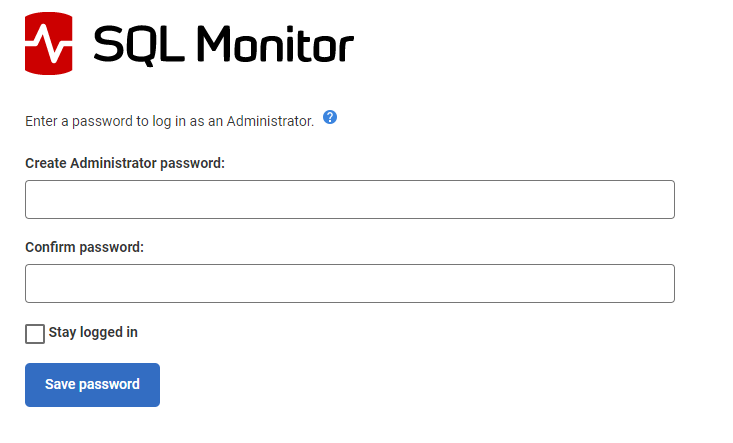
The password you enter automatically creates the Administrator user role. If you don't see the Create Password page when you enter the URL for SQL Monitor, check that the details for the Base Monitor machine and port number are correct and that the Base Monitor service is running.
Once this step is complete, administrators can then:
- Assign other users to one of the available user roles. See: Managing user roles. The Administrator may also choose to switch to Authenticating with Active Directory. If so, they will need to supply an Active Directory account to act as the administrator.
- Start adding the SQL Servers that need to be monitored.
Next steps
If you need to install multiple base monitors, go to: Multiple Base Monitor installations.
If you're ready to start adding servers and using SQL Monitor, review: Using SQL Monitor for the first time.
This documentation contains proprietary information and is protected by copyright law.
Copyright © 2026 Red Gate Software Limited. All rights reserved


