ReadyRoll 1.3 release notes
Published 11 February 2016
1.3.3.0 - October 31st, 2012
Today I am excited to announce Octopus support in ReadyRoll SQL Projects! If you’re not familiar with it, Octopus is the automated release management tool for .NET that everyone’s talking about.
ReadyRoll is a SQL Server database change management tool for Visual Studio 2010/2012.
In a sense Octopus and ReadyRoll are spiritual cousins in that they both support the build once, deploy many times tenet of Continuous Delivery: the practice of ensuring that the same build artifacts (binaries, scripts, etc) used in Dev testing are carried all the way through to Production.
ReadyRoll supports this practice by following the imperative database change pattern: migration scripts are fleshed-out in Dev and incrementally deployed through Test and Production.

With the release of version 1.3.3, ReadyRoll now builds a type of NuGet Package-based file that can be consumed and deployed to all your environments by Octopus.
Just follow a few simple rules for authoring and maintaining your change scripts and you will be a step closer to achieving database deployment nirvana: a repeatable, reliable release process for all of your SQL Server projects (oh yes, and those ASP.NET applications/Windows Services as well!).
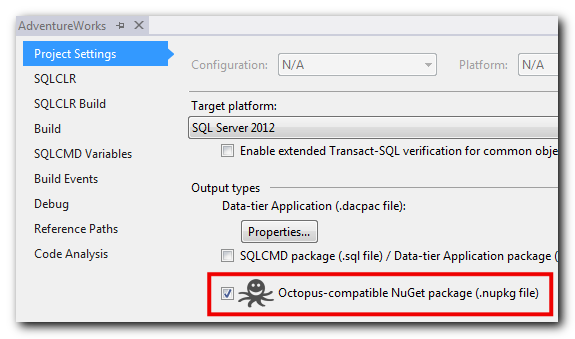
This is how it works. First enable artifact packaging within your ReadyRoll SQL project settings:
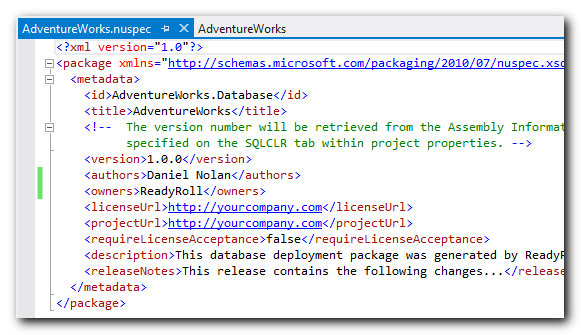
Then click Add/Edit NuSpec File to add a package metadata file to the project:
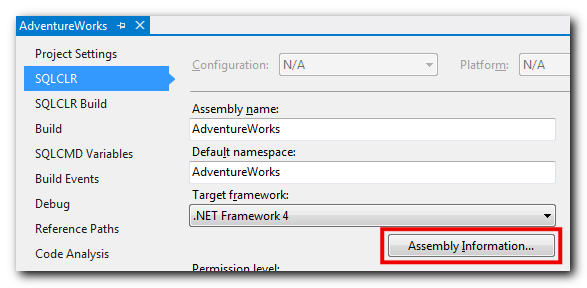
Add version details within the Assembly Information, accessible from the SQLCLR tab:
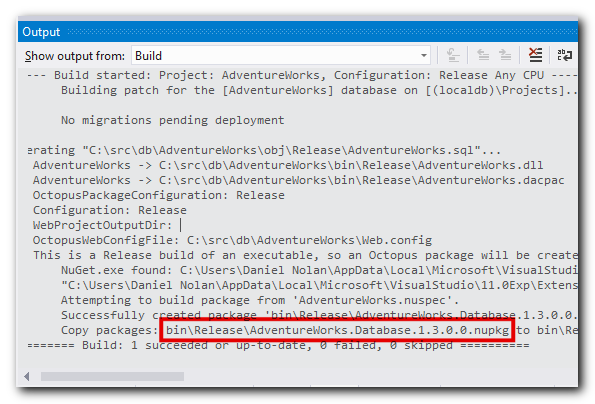
Now switch to the Release configuration and Build the solution to test the new settings. ReadyRoll will use OctoPack to create an Octopus-compatible NuGet package:
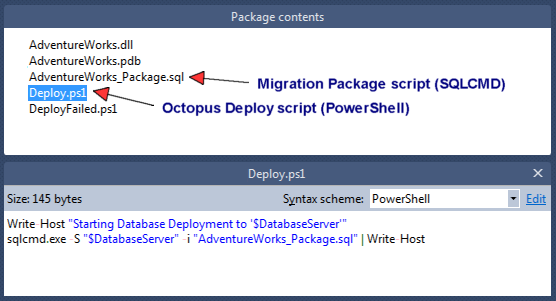
Opening up the contents of the output package will reveal a handful of deployment assets:
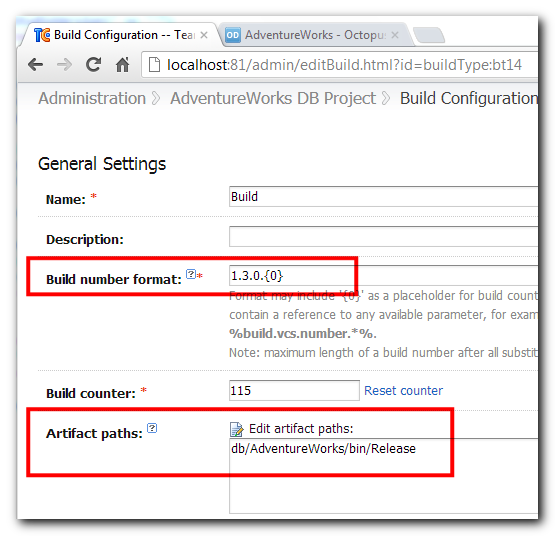
Now set up your project for Continuous Integration and collect the produced artifacts from the \bin\Release folder. Here we’re using TeamCity:
After performing a build, the package will be ready to serve via a NuGet feed. Note I am skipping over quite a few steps here for sake of brevity, but Paul Stovell has written a great guide to setting up OctoPack with TeamCity if you need any help getting started.
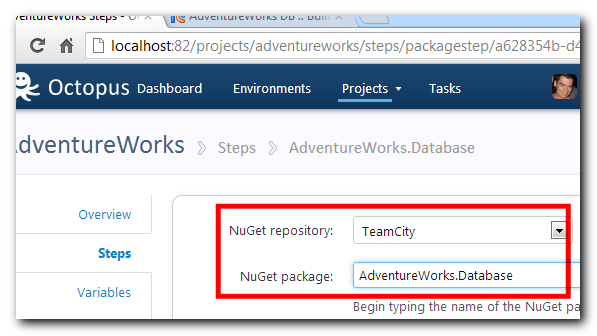
Now let’s setup a Octopus Project to consume the package from the TeamCity feed:
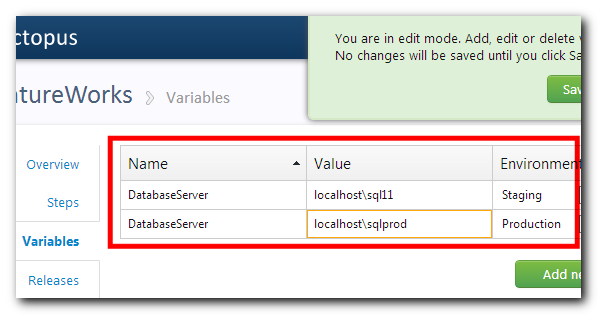
And add a $DatabaseServer variable for each SQL Server in the target environments:
To test out the deployment, click Create release and then Deploy to [Environment]. As this is the initial deploy to the Stagingenvironment, the database will be created from scratch and all project migrations applied:
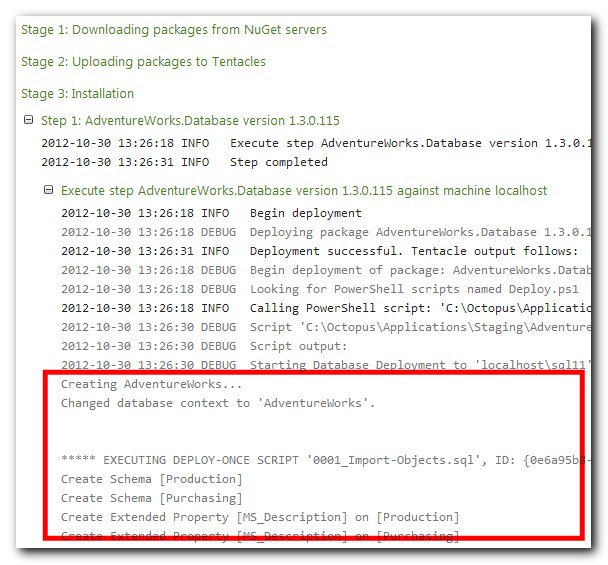
In subsequent deployments, the package will only deploy any new migrations that have been added to the project (if any).
When you’re ready to deploy onto other environments, including Production, click Promote to… [Environment]. The exact same set of migrations will execute against your upstream environment, rolling-back in the event of any issues, giving you a predictable deployment outcome every time!
Summary
This is the first release to include support for Octopus, however there’s still a few more features to come that will strengthen the integration between the tools, including support for SQLCMD variables and also new functionality to help with managing migrations throughout lifecycle environments.
1.3.1 - September 12th, 2012
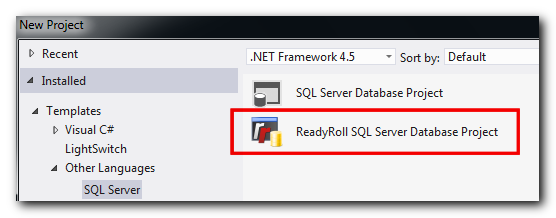
Today I am excited to announce the release of ReadyRoll SQL projects for Visual Studio 2012!
ReadyRoll is a new type of SQL Server project for VS2012 (and VS2010 Sp1) that deploys using T-SQL migrations. It integrates with the SSDT database object designers for migration script authoring, but also allows you to work Online within SSMS.
What’s new in VS2012?
The ‘DataDude’ team at Microsoft have made a big investment in the database development tools in Visual Studio 2012, collectively known as SQL Server Data Tools (SSDT).
One of the best features is the new table designer within the SQL Server Object Explorer: Not only does it prevent you from accidentally breaking dependant objects (e.g. views and stored procedures), it also lets you make changes to correct any invalid column references and then apply the changes to the database in a single, atomic batch. Neat!
Another great innovation is the replacement of SQL Server Express with SqlLocalDb, which provides a lightweight instance of SQL Server, making it easier for developers to establish a truly isolated development environment.
What is ReadyRoll?
ReadyRoll complements these new tools by introducing a simple project system which allows you to deploy databases using your own scripts. By making the best of what Visual Studio has to offer – integrated design, build, test and source control – database schemas are no longer the poor cousins of the AppDev world!
How does it work?
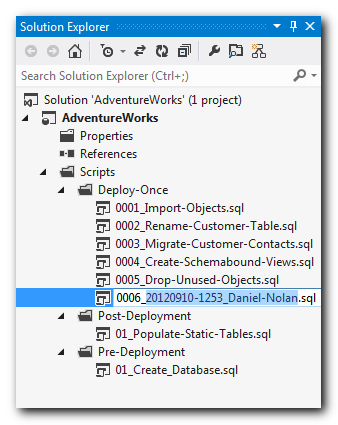
Within your ReadyRoll database project, you provide a set of T-SQL scripts with a unique ID and a numerically prefixed filename: when you deploy your database project, ReadyRoll will execute your scripts in the order provided. A log table within your database provides an audit of each deployment, ensuring that each script is executed a single time only.
This is one of the most well established paradigms in database change management, and is used by tools such as Rails ActiveRecord migrations, Entity Framework CodeFirst, as well as many OSS deployment tools.
How does this differ to ‘DataDude’ projects?
ReadyRoll uses imperative deployment, where each user script defines CREATE/ALTER/DROP statements. By contrast, the projects built-in to Visual Studio use declarative deployment, where each database object is defined using a CREATE statement. In declarative projects, these object templates are authored at design time and then synchronized with a physical database during solution build (internally, the project system generates imperative T-SQL on-the-fly). While this system supports a high degree of change automation, it may not suit all teams.
How are scripts authored?
ReadyRoll provides a number of ways to create new scripts in your projects, depending on how you prefer to work.
Working within Visual Studio only
Visual Studio 2012 (and Visual Studio 2010 with SSDT) comes with a rich set of tools that let you work online with your database, so that you never have to leave the IDE.
When you create a new ReadyRoll project, a new database will be automatically created for you.
To get started, open the SQL Server Object Explorer (SSOX) window and expand the (localdb)\Projects SQL Server instance to reveal your new database. Navigate to the schema and begin creating new objects using the built-in designers.
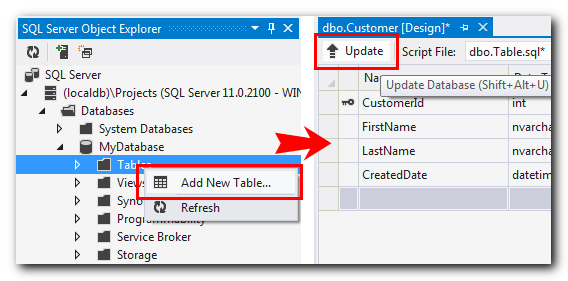
When you want to apply your changes, click Update and then Generate Script: ReadyRoll will add the generated script to your project for review prior to deployment. When ready to deploy, press Start [F5] or use the Deploy Project command.
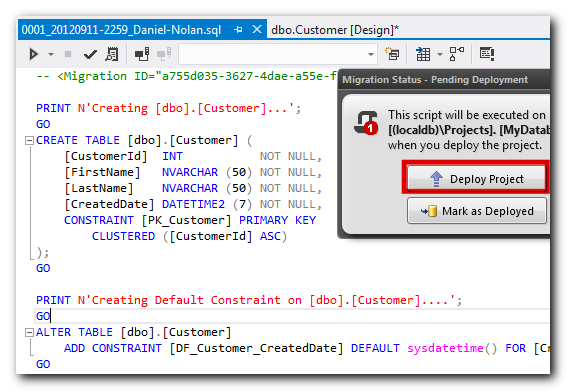
ReadyRoll will then perform a “gated deployment” on your database: after the script is parsed, your migration script is deployed to a copy of the project database (named MyDatabase_MyUsername_SHADOW). This step ensures that not only does your script contain valid object references, but also that your target database does not drift from your project database. For example, it prevents an ALTER operation occurring before a CREATE operation.
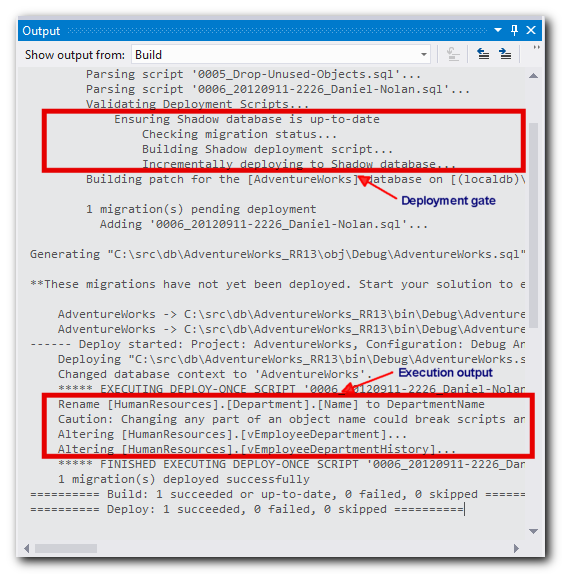
Here’s the output from the Deploy command:
You can then check your scripts into source control, deploy to upstream environments (DEV/TEST/PROD) or receive scripts from other team members.
Working with SQL Management Studio (SSMS) + Visual Studio
If you’re a T-SQL junkie or prefer an environment that’s geared purely for database design and administration, the good news is that you can also work Online with your database using SSMS.
Once you’ve created a new ReadyRoll project and connected it to your database, you can write and execute T-SQL directly within SSMS, or use the designers if you prefer.
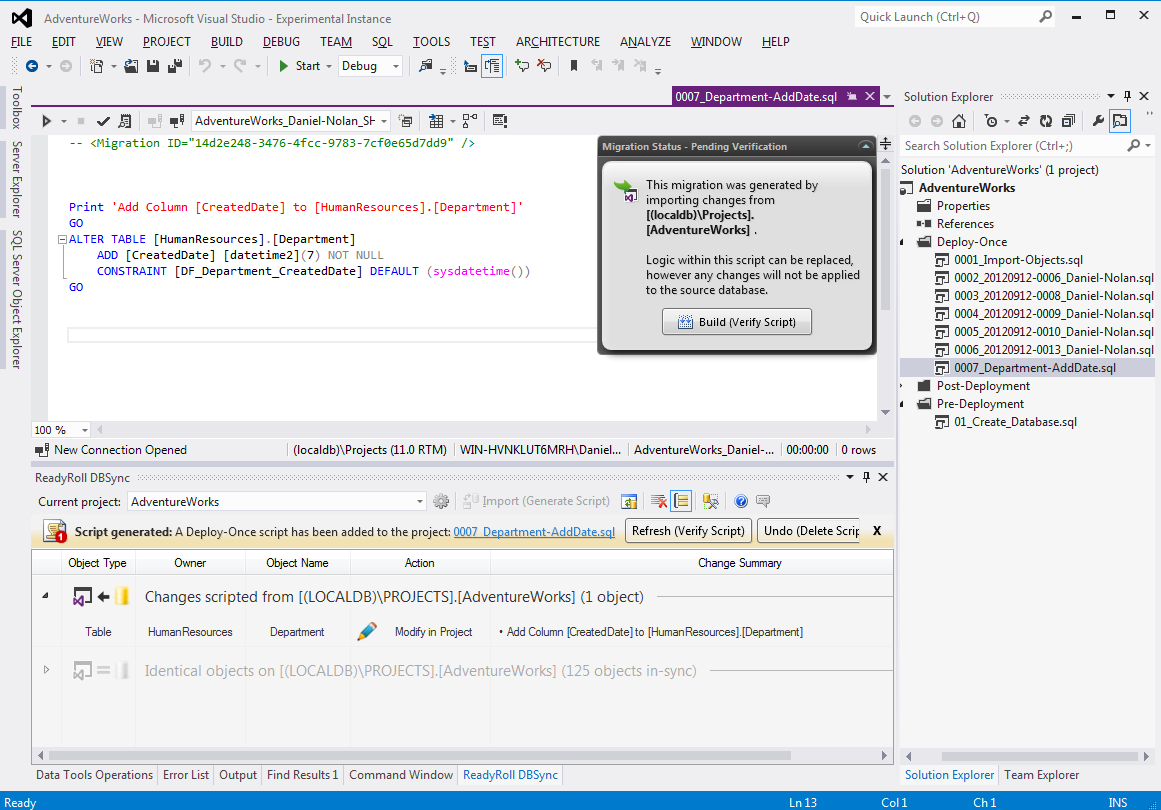
Once you’ve finished your work, switch back to Visual Studio, open the ReadyRoll DBSync tool window and click Import (Generate Script). This will generate and add a new migration script to your project.

Click to see a full view of the window
If the generated script doesn’t do what you expected (eg. a table rename is scripted as a DROP/CREATE), you can simply paste in your own T-SQL logic. If you made an unintended change, click Undo (Delete Script), select the object in the list and use the Revert context-menu command to return the object(s) to the previous state.
You can then check your scripts into source control, deploy to upstream environments, and/or receive scripts from other team members. Be sure to check the DBSync tool to ensure that all scripts have been applied to your database before continuing work within SSMS.
Working with pre-scripted T-SQL
If you’ve already got some scripts written, or if you need to deploy scripts provided by a vendor (eg. ASP.NET Membership Provider object creation scripts), simply create a new project and then add a new Deploy-Once script file.
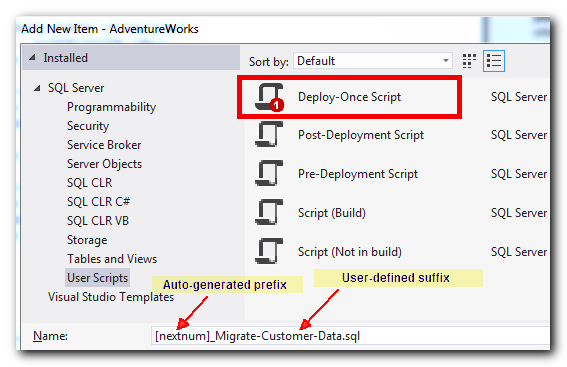
Paste the T-SQL into the new script, and then click Deploy Project or, if the objects have already been created in the target database, click Mark as Deployed to prevent the script from being re-executed.
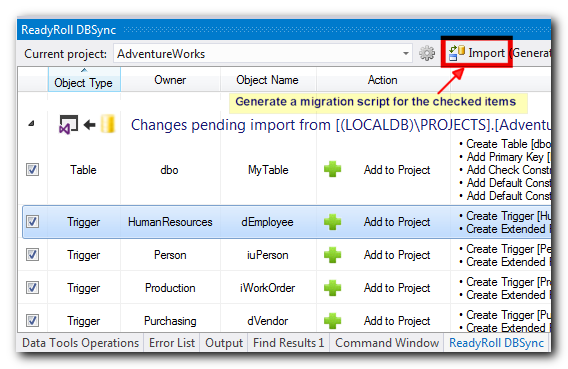
Working with existing databases
If you would like to import objects from an existing database, firstly connect the new project to a copy of the database and click Import (Generate Script) within the DBSync tool: a single script to create all of the imported objects will be generated and added to the project. You can then create additional scripts using any of the above methods.
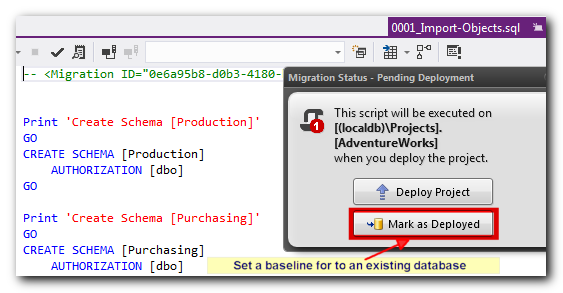
To deploy an existing database to upstream environments (DEV/TEST/PROD), you may need to set a baseline in each target environment. This can be done in the UI or via command line. To set a baseline using the UI, firstly connect the project to the target database and open the imported object script for editing. Click Mark as Deployed to prevent the script from being re-executed on the target.
How do I publish to a remote database server?
ReadyRoll projects can be deployed to a remote server by command line or automated using a Continuous Integration server like TFS Build or TeamCity.
To perform a deployment from the command line use the following syntax:
MsBuild.exe MyDatabase.sqlproj
  /p:TargetServer=MYSERVER\INSTANCE
  /p:TargetDatabase=MyDatabase
  /p:DBDeployOnBuild=True
This will produce a SQL file containing any unapplied scripts for the target server/database, and then use the SQLCMD utility to execute the generated script against the target.
If you would like to set up automated deployment using Continuous Integration, provide the following settings in a new build configuration:
Runner type: MSBuild
Build file path: MyDatabase/MyDatabase.sqlproj
MSBuild version: .NET Framework 4.0
MSBuild ToolsVersion: 4.0
System Properties:
- TargetServer = MYSERVER\INSTANCE
- TargetDatabase = MyDatabase
- DBDeployOnBuild = True
Unfortunately you will need to install VS2012 and ReadyRoll on your build server/agent to perform your deployments. Build dependency management will be simplified in an upcoming release.
The extension is compatible with Visual Studio 2010, but it is recommended that you first install VS2010 Sp1 and SSDT pre-requisites (bootstrapped in the installer).
1.3.0 - July 26th, 2012
The focus of this ReadyRoll release can be summed up in a single word: usability.
It became clear after a recent usability study that there were a number of areas of the product that needed further development. To show that this feedback has taken to heart, I’ll detail some of the issues that were highlighted during this review, along with the work that has been done to improve the product.
DBSync Tool Workflow Improvements
The DBSync tool is a central part of the ReadyRoll database project system, responsible for listing of pending changes in the schema model and the generation of migration scripts.
This tool was originally built with the ability to author database changes in two distinct ways:
Offline workflow (Project → Database): User would make changes to project schema model, then use the tool to generate & add a migration script to the project, then deploy it to the sandbox database
Online workflow (Database → Project): User would make changes directly to their sandbox database, then use the tool to import changes into the project schema model and generate a migration script (also added to the project)
Problems with this approach:
- It was messy: Removal of a generated migration script from the project required the user to revert changes in both the database and the project schema model
- It was complicated: Users found that having a bi-directional flow was confusing because the origination of changes would often be unclear (particularly in the above scenario)
- It was high maintenance: Having to manage both a schema model and a set of migration scripts in the project added significant overhead to the process of authoring changes
Or to put it more simply, by attempting to support two diametrically opposed workflows, the tool would tend to hinder productivity rather than enhance it.
Changes that have been made to address this:
- The Offline workflow has been dropped; now only the Online workflow is supported
- The Schema Object Model is no longer maintained in the ReadyRoll database project structure
- The main “call to action” in the DBSync tool window – the Synchronize button – has been recaptioned “Import (Generate Script)” to reflect that the flow is now uni-directional
Users unanimously favoured the Online workflow, making the decision to scrap the Offline workflow a fairly straightforward one. Though there are still benefits of working offline, such as the ability to resolve conflicting object changes in source control or to annotate individual objects (i.e. to view an object’s revision history), it will only be reintroduced if this can be done without sacrificing the simplicity of the primary workflow.

By consolidating on a single workflow for synchronizing database changes, the path has been cleared for a whole bunch of other usability enhancements, including:
- One-touch Import: You can now import changes from your sandbox database with one click of the
 button; you no longer have to go through the intermediate step of previewing the pending changes first.
 - Post-import stage added: Freezes the change list after Import but still allows you to view individual object differences (previously the change list would be hidden immediately upon sync).
- Undo Import button added: Simply deletes the last the generated script file and refreshes the pending change list. Note that you can also undo earlier Imports by removing migration scripts from the project in reverse-chronological order.
- In-line notifications added: This replaces a number of confirmation and popup dialogs, reducing friction in the sync workflow.
- Pending change list now grouped by change type: If the change to be scripted by ReadyRoll causes dataloss in the associated object, it is now displayed prominently at the top of the change list. Displaying of groups can be toggled with the
 button on the DBSync toolbar.
 - Debug generated migration script: After you import your changes, ReadyRoll will open the script in the IDE to allow you to debug against a separate copy of your database. You can also make changes to the file to override the generated T-SQL, for example you might want to replace a DROP/CREATE statement with an EXEC sp_rename call.
- Object selections retained in the project file: If you uncheck an object prior to performing an Import, it will not be re-selected during subsequent Imports. Additionally, any unselected changes will be collapsed into a new group called Not scripted after clicking Import.
Please note that you can still initiate changes from Offline by using the Solution Explorer to add a new script to the project and supplying your T-SQL migration logic.
T-SQL Migration Script Editor Widget
Because migration scripts are designed to be executed a single time only, it can be important to know if and when an individual script has been deployed: if a script has already been deployed to the target database, special care is needed when making changes to it (in most cases its advisable to avoid making changes to deployed scripts, unless you’re in the position to recreate any affected databases).
The new script editor widget appears in the top-right hand corner of the editor window to provide you with basic detail on whether it has been deployed, and if so, the time and date of deployment.

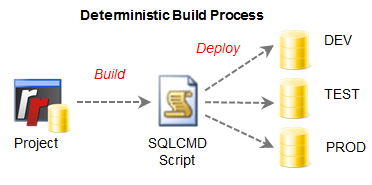
Build Process Redesigned to Deploy by Patch
Previously, a ReadyRoll build would produce a singular, monolithic deployment script that contained every migration (scripts under the Deploy-Once subfolder) and pre/post deployment script in your project. Each migration would be wrapped in conditional statements to ensure that it is executed a single time only. The script also contained logic to create the database and supporting objects as needed.
You can see a sample of this type of script here: AdventureWorks_Create.sql
Similar to how you might release an ASP.NET application, the idea was that you could build your project once and deploy it to any instance of the target database (i.e. DEV/TEST/PROD).
Though this deterministic style of deployment made the build artifacts quite portable, it was at the expense of script readability: because the script contained every migration that ever was, DBAs in particular expressed concern that there was little visibility of which migrations would be applied when the script was executed. Also, because every batch in the script was wrapped in a conditional statement, it was difficult to review the actual T-SQL of each migration.
With this in mind, the deterministic build has been replaced* with a method that deploys changes as a series of patches, where only the pending migrations are included in the script produced by the build. This is the type of approach you’ll find in OSS tools like LiquiBase and dbDeploy.
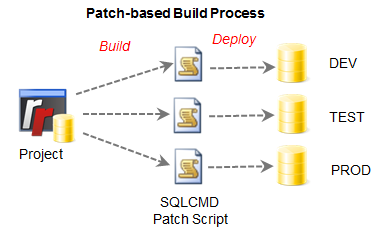
You can see a sample of a patch script here: AdventureWorks.sql
Benefits of the patch-based build and deployment process:
- The script that is produced by the build process can be peer reviewed prior to deployment
- Builds are incremental, meaning that the engine only ever needs to process new or changed T-SQL files during build/deployment
- The number and names of each migration to be executed are clearly displayed before and after deployment
- If you’re using TeamCity for Continuous Integration, the pending migration count will also be displayed as part of the build status
- Script layout is improved, with each pending migration from your project separated into distinct ‘regions’
- Script contains logic to ensure that it is executed against the intended database and server only (aborts if not)
Note that this new style of build still incorporates the same error and transaction handling as before, ensuring that all deployments are carried out atomically (or rolled-back upon error).
Here’s an example of how you can create a patch script outside Visual Studio and deploy migrations to a remote SQL Server:
MsBuild.exe c:\src\AdventureWorks\AdventureWorks.sqlproj
/property:DBDeployOnBuild=True /property:TargetServer=MYDBSERVER
The hope is that by making the deployment process clearer for everyone in your team, you can avoid coming a cropper with your DBA and focus on getting things done!
Additional enhancements to the build:
- ReadyRoll now uses version 11.0 of the Microsoft SQL Server Command Line (SQLCMD) utility, often resulting in significantly improved deployment performance (e.g. AdventureWorks now deploys in 5 seconds instead of 50 seconds). This is (likely) owing to the switch from OLEDB to ODBC connectivity in SQLCMD 11.0 (more info about this switch is available on the MSN blog). If you haven’t installed the SQL Server 2012 Native Client & CLI, the ReadyRoll installer will bootstrap these dependencies for you.
- If you’d prefer to keep using deterministic builds, this is still available as an option under the Project Settings tab of the Project Properties window.
Online Database Development in Visual Studio (experimental)
In version 1.2, support for SQL Server Data Tools (SSDT) was introduced through a new type of Database Project. This made it easier to setup an isolated database development environment by integrating with a simplified version of SQL Server Express called SqlLocalDb.
Version 1.3 builds on this support by integrating the suite of online schema object designers with your ReadyRoll Database Project. What this allows you to do is to make online changes to your database without leaving the IDE.
As an example, here’s how you might create a new table using the SSDT designers:
- Show the SQL Server Object Explorer tool-window and expand your server and database to view list of existing objects
- Right-click Tables, select
 and use the designer to add columns and constraints
 - Click
 on the designer toolbar to present the change review dialog
 - Click Generate Script to generate a new migration script in your ReadyRoll Database Project
- Start the solution
 to deploy the changes, or click the Deploy button in the ReadyRoll DBSync tool
In the above example, the migration was saved directly into the project, allowing the changes to be deployed locally and then checked into source control.
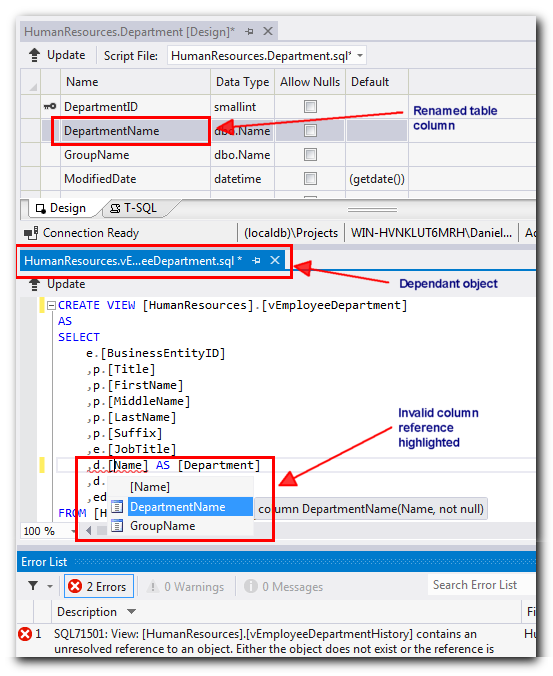
So you might be thinking, okay that’s sort of convenient, but not earth-shatteringly useful. Well where SSDT really shines is in its ability to refactor objects in batches. For example, say you want to rename a column that is depended upon by a number of views in your schema. Unless your views are schema-bound, SQL Server will let you break those dependencies with only a vague post-deployment message to alert you. However, if the SSDT designer is used you can get a heads-up on those dependencies before generating a migration script.

Try this refactoring example with the AdventureWorks sample project:
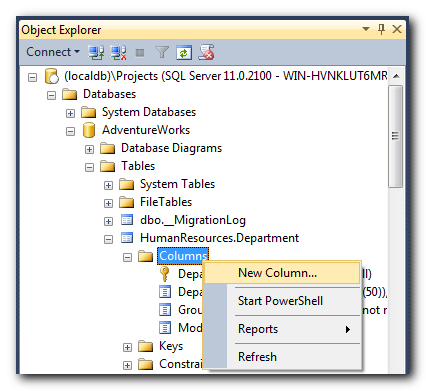
- Expand the AdventureWorks Table list in the SQL Server Object Explorer and right-click HumanResources.Department and select

- In the designer, rename the GroupName column to Group.
- When you click Update, the tool will highlight that a number of dependencies need to be resolved before continuing.
- Switch to the Error List tool-window to view and make the necessary edits to resolve the dependency errors.
- Click
 in the designer to generate a script containing a batch of changes for all of the objects involved.
 - Start the solution to deploy the changes, or click the Deploy button in the ReadyRoll DBSync tool.

Hey presto, you’ve just batch applied a table change along with updates to its associated dependencies. Of course, if there are dependencies from outside the database on the affected object, you’ll still need to hunt those down and resolve them separately.
Please note that this integration is still at the experimental stage, so any feedback on how well (or otherwise) this works for you would be very welcome.
If you don’t already have SSDT installed, don’t worry: the ReadyRoll installer will give you the option to download this from Microsoft during setup.
Working with Existing Databases - Setting a baseline
One complication of with working with migrations is how to deploy a database that is already established in Production (i.e. beyond the point where you can simply drop and recreate the schema as needed).
Prior to version 1.3, each script generated by ReadyRoll would contain IF EXISTS T-SQL statements to test whether the operation was needed, thus implicitly creating a baseline during a database’s initial deployment. Unfortunately, this method added a fair amount of bulk to the generated migration scripts and also required the use of dynamic T-SQL (wrapped in EXEC calls) to deploy objects like views and stored procedures.
Version 1.3 replaces this with the ability to set an explicit baseline for that initial deployment. You can now specify the high-water mark for your database as follows:
- Create a new ReadyRoll project in Visual Studio
- Click Configure in the ReadyRoll DBSync tool and connect your project to a copy of your existing Production database
- Import all objects from the database to generate a Deploy-Once migration script in your project
- When deploying your database project for the first time, specify the BaselineUptoMigration property with the filename of the migration script as the value, e.g.
MsBuild.exe c:\src\AdventureWorks\AdventureWorks.sqlproj
/p:DBDeployOnBuild=True /p:TargetServer=MYDBSERVER
/p:BaselineUptoMigration=0001_Imported_Objects.sql
In this example, the AdventureWorks database on MYDBSERVER will be setup for first use with ReadyRoll by marking0001_Imported_Objects.sql as done (thus preventing it from being executed against the target). Any subsequent migration scripts, however, will be deployed as normal.
As an extra bit of insurance, setting of a baseline for existing databases is now mandatory, avoiding the possibility of accidentally deploying over the top of an existing schema (hello [master] database!).
Summary
Though there are some fairly substantial changes in this release, there is one constant which remains ReadyRoll’s central pillar: migration-based schema deployment.
Certainly, ReadyRoll is not alone in supporting migrations, but the aim is to have a tool that the whole team can use to build and evolve your database schemas: to create a virtuous cycle of source control, continuous integration and transparent deployment that encourages experimentation in the Development phase and helps make the Production release a predictable and mundane event.
This documentation contains proprietary information and is protected by copyright law.
Copyright © 2026 Red Gate Software Limited. All rights reserved


