Scheduling restores - specify the file locations
Published 13 February 2013
Scheduling restore jobs > Select destination server and backups to restore > Select destination database > Specify file locations > Specify verification options > Configure restore options > Create restore schedule > Review summary
On step 3 of the wizard, specify the location of the database files. The options available depend on whether you opted to restore from a Folder and file name pattern or Specific backup files on step 1.
Restoring from a folder and file name pattern
If you have selected Restore from folder and file name pattern on step 1, you must specify where the database files are restored to using one of three options:
- All files to default locations
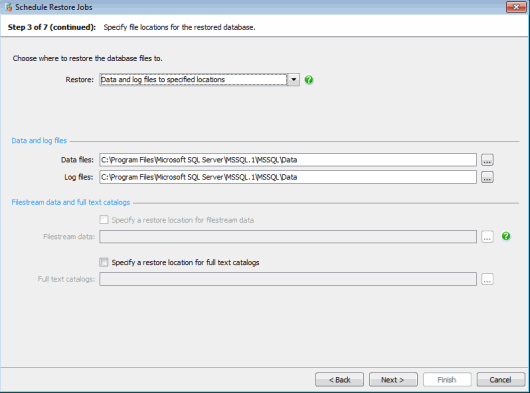
- Data and log files to specified locations
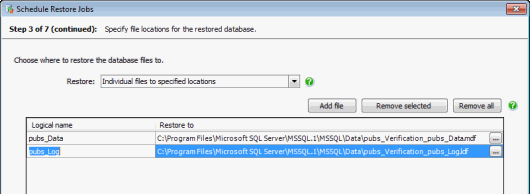
- Individual files to specified locations
All files to default locations
- If you have selected Overwrite existing database on step 2, the existing database's data and log files will be overwritten. Other files which previously belonged to the database but which are not overwritten will be deleted. The existing database should use the same paths for the data and log files (either on the same server or a different server) as the source database, otherwise the restore will fail. For example, if the source database's files are stored in C:\Program Files\Microsoft SQL Server\MSSQL\Data, the data and log files of the database being overwritten should also be stored in C:\Program Files\Microsoft SQL Server\MSSQL\Data, whether on the same server or a different server.
- If you have selected Create new database on step 2, the database files will be restored to the locations defined in the backup file. If the database files of the source database are still in the locations defined in the backup when the job runs, the restore will fail because the files already exist. SQL Backup Pro cannot overwrite the database files because creating a new database does not add
WITH REPLACEto theRESTOREcommand. To avoid this, do one of the following:- move or rename the source database files before the job runs.
- select Data and log files to specified locations and specify alternative locations (the files will be restored using the file names defined in the backup).
- select Individual files to specified locations to specify a location and file name for each database file.If the locations defined in the backup do not exist on the destination server when the job runs, the restore will fail. This may happen if you are restoring to a different server and the path defined in the backup does not exist on that server. Select Data and log files to specified locations or Individual files to specified locations to specify locations (either on the destination server or another server).
Data and log files to specified locations
Select Data and log files to specified locations to specify the locations each type of database file is restored to. You can specify a location for data files, log files, filestreams and full text catalogs. The files will be restored to the specified locations using the file names defined in the backup.
- Type the path or click to open the Folder Browser and select a location or make a new folder. The files will be restored to the specified folders using the file names defined in the backup file.
Note that the file path is relative to the selected SQL Server. For example, if you are restoring a database on a remote SQL Server instance called ServerA and you specify a local path such as C:\Data, the backup files will be created on the C: drive on ServerA, not on the local server. - If the database includes filestreams (SQL Server 2008 and later) or full text catalogs (SQL Server 2005), you can specify the locations that they are restored to. If the database contains more than one filestream or full text catalog, a subfolder will be created for each one within the specified folder.
If the database includes filestreams or full text catalogs and you do not specify a location, they will be restored to the default locations (see above).
Individual files to specified locations
If you have launched the Schedule Restore Jobs wizard from a reminder, this option is selected by default and populated with the logical names of the database files from the source database. The restore locations are populated using the default file locations for the destination server and file names composed of the source database name, followed by _Verification, followed by the existing file name, for example AdventureWorksDW_Verification_AdventureWorksLog.ldf.
Select Individual files to specified locations to specify the location and file name that each data and log file will be restored to. You can also specify where filestreams or full text catalogs are restored to. Any files that you do not specify will be restored to the default location (see above).
For each database file:
- Click Add File to specify where a database file will be restored to.
- Under Logical Name, type the logical name of the file.
- Under Restore To, type the location or click to open the File Browser and select the location or create a new folder to restore the file to. You can also rename the file by entering a new file name.
Note that the file path is relative to the selected SQL Server. For example, if you are restoring a database on a remote SQL Server instance called ServerA and you specify a local path such as C:\Data, the backup files will be created on the C: drive on ServerA, not on the local server. - To specify a location for another file, click Add file.
For information about finding the logical names and other details of database files, see Finding database files.
Restoring from specific backup files
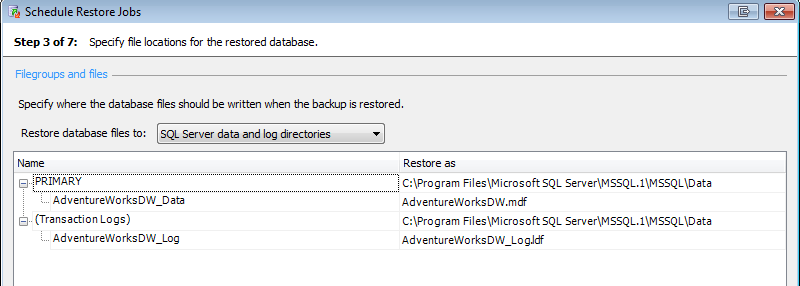
If you have selected Restore from specific backup files on step 1, the details of the database files are populated from the backup.
Database files will be restored to the default SQL Server data and log directories, unless you change the file locations. You can select Original database data and log directories from the drop-down list, or specify the location by selecting Other (Custom) and clicking to open the Folder Browser or File Browser. Note that the file path is relative to the selected SQL Server. For example, if you are restoring a database on a remote SQL Server instance called ServerA and you specify a local path such as C:\Data, the backup files will be created on the C: drive on ServerA, not on the local server.


