Setting up a project with a companion tSQLt project in SSMS
Published 10 July 2020
In this walk-through, we will set up a new SQL Change Automation project for an existing database, then create a companion SQL Change Automation project to support writing and running tSQLt tests. Comparison options and filters will ensure that these projects may work together, but do not contain the same objects.
Here is an overview of the steps we will take:
- Create an example database, Northwind
- Create a local Git repo, which will hold two projects, and add a .gitignore file
- Create a SQL Change Automation project, northwind, for Northwind database code
- Install the tSQLt framework into the Northwind database
- Create a second SQL Change Automation project, northwindtest, for Northwind tSQLt tests
- Create an upstream Git repo in Azure DevOps and push both projects to the repo
- Create a build pipeline to validate both projects as part of continuous integration
Is your team also using Visual Studio?
If team members will be using both Visual Studio and SSMS to work on this project, it is best to walk through this setup process in Visual Studio and perform a couple of additional steps specific to that IDE.
In this case, follow the Using tSQLt in Visual Studio guide for setup instead of this document.
1. Create an example database, Northwind
I am creating an example database named Northwind using this sample code provided by Microsoft under the MIT license. This will serve as my development database.
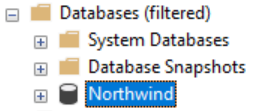
After running the script against my development SQL Server, I am able to see the Northwind database:
2. Create a local Git repo, which will hold two projects, and add a .gitignore file
First, download and install the latest version of Git.
The installer will recommend adding minimal Git wrappers to your PATH.
Open the terminal of your choice and create a folder locally for your repo. In my case, I used Windows Terminal and ran:
mkdir C:\Git\Northwind\
Change into the directory and initialize a Git repo.
I did this by running:
Initialize local Git repo
cd C:\Git\Northwind\
git init
Git responded with the message, "Initialized empty Git repository in C:/Git/Northwind/.git/"
Download the sample SQL Change Automation .gitignore file, extract the file, and add it to the Northwind folder.
This repo will have two SQL Change Automation projects, so we need to edit the .gitignore file to support them both.
Edit the file to remove leading slashes so that it will exclude .dbmdl, .ifm, and .sqlproj.user files, regardless of their folder locations.
Edit .gitignore file to work with multiple .sqlproj files in subfolders
bin/
obj/
*.dbmdl
*.ifm
*.sqlproj.user
Save and close the file.
3. Create a SQL Change Automation project, northwind, for Northwind database code
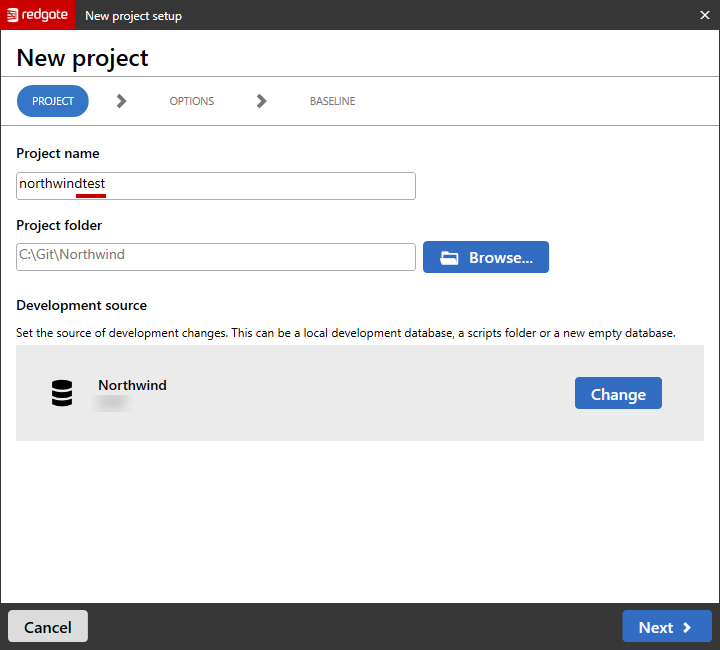
Open the SQL Change Automation plugin from the Redgate Toolbar in SQL Server Management Studio (SSMS) and click the "New Project" button. Name the project, specify the local git repo you initialized as the project folder, and set the development source to be the Northwind database.
Note: a subfolder will automatically be created for our new project inside this directory when we complete this wizard, and the path to our sqlproj file will be: C:\Git\Northwind\northwind\northwind.sqlproj.
Click 'Next' after you have filled in the project details.

On the 'Options' screen....
A. Click the "Edit comparison options" button.
- In the pop up, confirm that the option "tSQLt frameworks and tests" is checked under "Ignore"
- Make any other changes to behaviors or ignore options as needed
- Click the "OK" button if you choose to change other options, or click "Cancel" if you did not make any changes
Consider whether you will use any schemas other than "tsqlt" or "sqlcop" for your testing objects. This can be useful if you would like to organize your tests in classes.
B. For this example, we are going to exclude everything in a schema named "xSchema", which we will use as a test class.
- Download Filter-Exclude-xSchema-Schema.zip, and extract the Filter.scpf file. You may review this file in a text editor if you are curious to see the syntax used. You may also load or edit this filter file in SQL Compare.
- Customize the file if you would like to use different schema name(s) than "xSchema" as a custom test class or test classes
- Click the "Apply filters" radio button and specify the Filter.scpf file
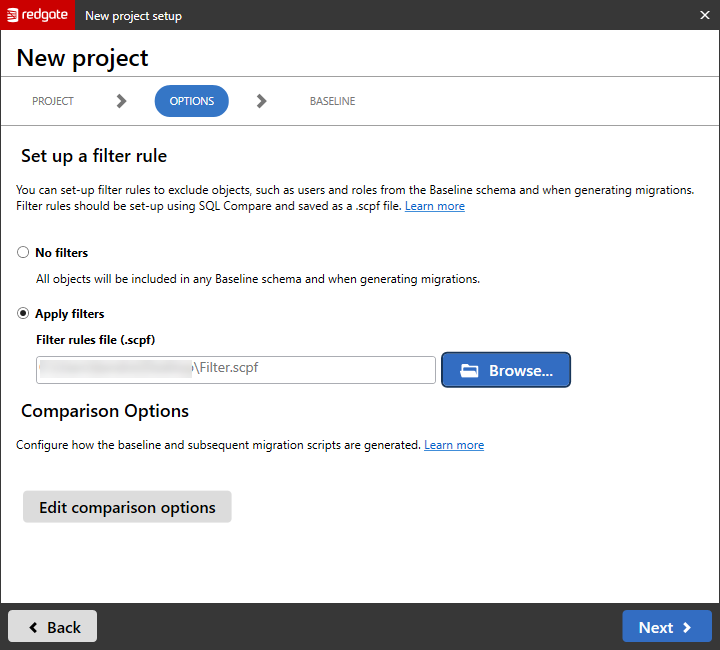
Click "Next" to get to the "Baseline" step.
Since we are working with an existing database, we will create a baseline schema script. If we were working with a real existing database where the production environment might be in a different state than our development database, we would probably connect to a restored backup of the production database at this point to create the baseline schema. Since I am simulating this with the Northwind database, I click "Connect to a database" and select the copy of Northwind which is also serving as my development database as the source of the baseline, then click "OK".
Finally, click the "Create project" button.
You should now see a message that the database project was successfully set up, with indications that the baseline script was generated. 23 programmable objects should be generated for the Northwind database.
When you click the "Check for changes" button, it should find that there are no changes to the development source, as in this case we used our development database as the source of our baseline script.
Click on the 'Version control' tab in SQL Change Automation to commit your changes.
You should see a list of files which have been added, including the .gitignore file, the Filter.scpf file, and a variety of scripts added by SQL Change Automation.
No files with a ".sqlproj.user" extension should be in the list, due to the .gitignore file.
Type a commit message, such as "Initial commit of northwind" and click "Commit".
Note: At this point we have not configured an upstream repo, so there is nowhere to push or pull from. We'll get to that in a bit.
4. Install the tSQLt framework into the Northwind database
Next, we are going to install the tSQLt framework.
Review the development database owner
If you are following this guide on a non-domain joined machine, I recommend that at point you right click on the "Northwind" development database in SSMS and click "Properties". On the "Files" tab of the database properties, review the "Owner" setting. If this is set to anything other than "sa", change the owner to "sa" and click OK.
When changes are made by tSQLt in a bit, the database owner setting is relevant, and having this set to a machine account can lead to errors.
If you wish to execute the owner change in TSQL, you can do so with the following script:
Set owner of development database
USE [master];
GO
USE [Northwind];
GO
ALTER AUTHORIZATION ON DATABASE::[Northwind] TO [sa];
GO
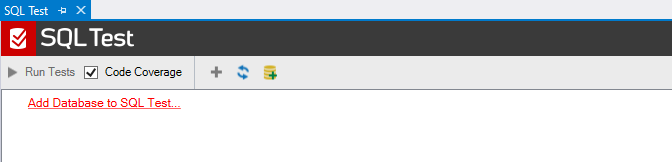
Open the "SQL Test" extension from the Redgate toolbar in SSMS.
Click 'Add Database to SQL Test" and select the Northwind development database from the list of databases that pops up.
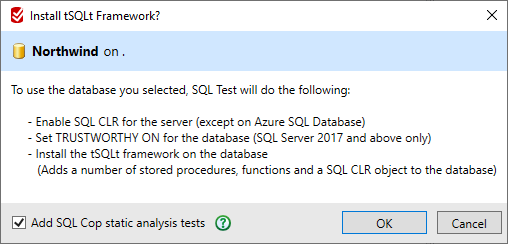
Click "Add Database".
A pop up will appear which summarizes the changes which will be made to your development database.
At this point you may choose whether to have SQLTest add additional SQL Cop static analysis tests or not. We will leave that enabled in our case.
Click "OK".
You will now see a dialog box tracking the summary as SQL Test installs the tSQLt test framework. Once this completes, click "OK".
Validate that your "northwind" SQL Change Automation project sees no changes
Return to, or reopen, the SQL Change Automation project you created for Northwind. On the "Generate migrations" tab, click "Refresh".
We used comparison options to exclude tSQLt and SQLCop objects by default, so no migration scripts should be suggested for import at this point.
Click "Close" to close this project.
5. Create a second SQL Change Automation project, northwindtest, for Northwind tSQLt tests
Click the "New project..." button in SQL Change Automation for a second time. Give the project a different name this time, one which denotes that this project holds tests. In this example I chose "northwindtest".
Choose the same repo used for the first project to hold the project folder.
A subfolder for your test project will automatically be created under the project folder.
Set the development source to the same development database you used for the database code project.
We will be using filters to ensure we only pull test framework and test code into this second project.
Click "Next".
On the 'Options' screen...
A. Click the "Edit comparison options" button and change the default for tSQL
- In the pop up, go to the "Ignore" section and uncheck he option for "tSQLt frameworks and tests" (so that they will not be ignored)
- Make any other changes to behaviors or ignore options as needed
- Click the "OK" button
B. Set a filter to include only tSQLt, SQLCop, and "xSchema" (or other schemas which you wish to use as custom test classes)
- Download Filter-Include-only-XSchema-tSQLt-SQLCop.zip, and extract the Filter.scpf file. You may review this file in a text editor if you are curious to see the syntax used. You may also load or edit this filter file in SQL Compare.
- Customize the file if you would like to use different schema name(s) than "xSchema" as a custom test class or test classes
- Click the "Apply filters" radio button, and specify the Filter.scpf file
Click "Next".
On the "Baseline" screen, click "Don't baseline."
Click "Create project".
After creating the project, you should see ~198 changes to import. Wait before importing them and make a change to the .sqlproj file first.
Edit the .sqlproj file for your test project and add the following as a new property group...
The .sqlproj file can be edited in a text editor or in a tool like VSCode.
Add this to your .sqlproj file for the test project
<PropertyGroup>

<MigrationLogSchemaName>test</MigrationLogSchemaName>

<SkipBaselineCheck>True</SkipBaselineCheck>

</PropertyGroup>
Save the .sqlproj file.
Recap: how we have configured the northwindtest project so far
We did not create a baseline script. We set our project comparison options to not ignore tSQLt related objects, and we set a filter which includes only objects in the tSQLt, SQLCop, and xSchema schemas.
In our case, xSchema is a custom schema which we are using to illustrate how you can create your own tSQLt test class.
Now import the changes with "Generate migrations"...
Scroll through the changes to import and look at the "Schema" column. You should see that the list only contains objects in the schemas we have specified, with only three exceptions:
- tSQLtCLR, which is of the type "Assembly," should be in the list and may show as having the schema "dbo"
- SQLCop is of the type "Schema", it will be in the list and may show as having the schema "dbo"
- tSQLt is of the type "Schema", it will be in the list and may show as having the schema "dbo"
Click "Generate migrations" at the top of the screen.
You should see a message that 1 migration script was generated and that ~182 programmable objects were created, and that the offline schema model was updated.
Click "Done".
You may now see a message that "CREATE ASSEMBLY for assembly 'tSQLtCLR' failed because assembly 'tSQLtCLR' is not trusted."
This message is occurring because SQL Change Automation is validating the scripts in your project against the shadow database, but the shadow database does not have all the settings at the database level which were configured when tSQLt was installed. This is because tSQLt was installed against the development database, not the shadow, and because database settings are not automatically imported as migration scripts.
To fix this error...
Click the "Migrations" tab in the "northwindtest" project, then...
- Click on the "Pre-deployment scripts" folder.
- Click "+ New Script" in the menu.
- Name the script "02_configure_Shadow.sql" (or the name of your choice)
- Add the following code to the script
Configure shadow database for tSQLt
IF $(IsShadowDeployment) = 1
BEGIN
-- This section is in place for building against localdb on azure hosted machines
IF 0 = (SELECT value_in_use FROM sys.configurations WHERE name = 'clr enabled')
BEGIN
EXEC sp_configure 'clr enabled', 1;
RECONFIGURE
END

ALTER AUTHORIZATION ON DATABASE::[$(DatabaseName)] TO [sa];
ALTER DATABASE [$(DatabaseName)] SET TRUSTWORTHY ON;

END;
GO
- Save the script and close it
Return to the "Generate migrations" tab
You may see a change in the tSQLtCLR assembly. If this is the case, click "Generate Migrations".
You will see that this generates a single migration with the following code:
Migration which appears after change
PRINT N'Altering CLR assemblies'
GO
ALTER ASSEMBLY [tSQLtCLR]
WITH PERMISSION_SET = EXTERNAL_ACCESS
GO
Click on the 'Version control' tab in SQL Change Automation to commit your changes.
You should see a list of files which have been added, all within the northwindtest folder.
Type a commit message, such as "Added tSQLt tests."
Click Commit.
6. Create an upstream Git repo in Azure DevOps and push both projects to the repo
You may use the Git implementation of your choice with SQL Change Automation. In this example, we will use a Git repo hosted in Azure DevOps.
Create a new Git repo in a new or existing Azure DevOps project.
Uncheck the "Add a README" button, as we don't wish to initialize the repo (we did this locally), and do not ask it to add a .gitignore file.
Copy the code to push an existing repository from the command line, then run the command locally in the context of your git directory.
Sample powershell to push to existing Git repo in Azure DevOps
git remote add origin https://yourorganizationname@dev.azure.com/yourorganizationname/yourprojectname/_git/yourreponame
git push -u origin --all
A pop-up may appear for authentication, complete it if required.
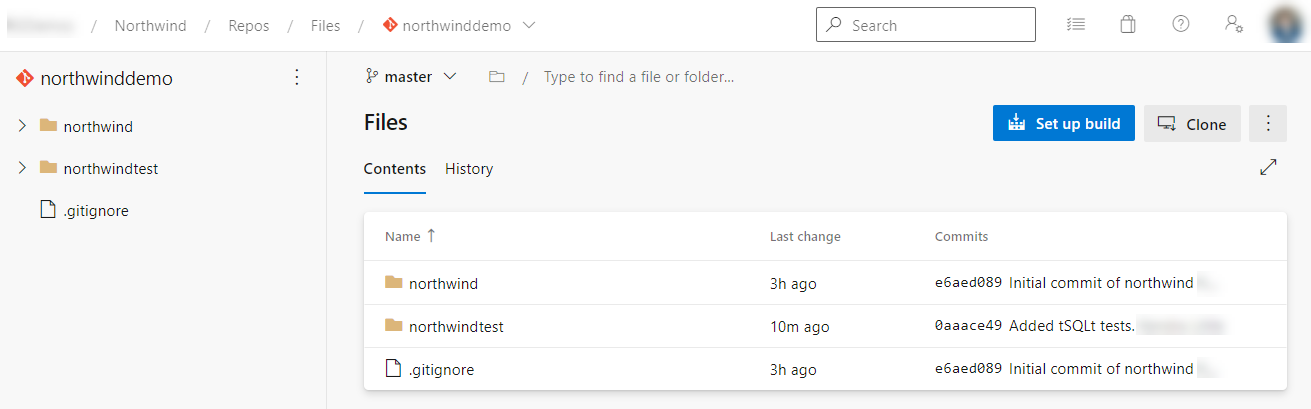
When this succeeds, your two SQL Change Automation projects will be pushed to your Azure DevOps Git repo. Refresh your browser to see the files.
7. Create a build pipeline to validate both projects as part of continuous integration
Click on "Pipelines" in the left menu in Azure DevOps, then...
- Click the "New pipeline" button at the top right
- Select "Azure Repos Git" as the source for your code
- Select the repository you pushed your code to
- When you reach the "Configure your pipeline" screen, select "Starter pipeline"
At this point you will have a screen with a starter YAML pipeline on it.
If you are not familiar with how to configure YAML pipelines, check out our 10 minute video, "Create a Build with YAML for SQL Change Automation."
Use the "assistant" and/or customize this example YAML pipeline so that you first build your .sqlproj file for the database, then test the .sqlproj file which you created to contain tSQLt related objects and tests:
Sample YAML pipeline in Azure Devops to first build and then run tests in SQL Change Automation
# Starter pipeline
# Start with a minimal pipeline that you can customize to build and deploy your code.
# Add steps that build, run tests, deploy, and more:
# https://aka.ms/yaml
trigger:
- master

pool:
  vmImage: 'windows-latest'

steps:

- task: RedgateSqlChangeAutomationBuild@4
  inputs:
    operation: 'Build SQL Change Automation Project'
    sqlProj: 'northwind/northwind.sqlproj'
    packageName: 'NW'
    tempServerTypeBuild: 'sqlServer'
    tempServerNameBuild: '(localdb)\MSSQLLocalDB'
    tempDatabaseNameBuild: 'Northwind'
    authMethodBuild: 'windowsAuth'
    nugetPackageVersionSelector: 'Specific'
    nugetPackageVersion: '1.0'
    nugetPackageVersionUseBuildId: true
    requiredVersionOfDlma: 'latest'

- task: RedgateSqlChangeAutomationBuild@4
  inputs:
    operation: 'Test SQL Change Automation Project'
    sqlProj: 'northwindtest/northwindtest.sqlproj'
    tempServerType: 'sqlServer'
    tempServerName: '(localdb)\MSSQLLocalDB'
    tempDatabaseName: 'Northwind'
    authMethod: 'windowsAuth'
    testAdvanced: true
    requiredVersionOfDlma: 'latest'
Note: in this case I am using an Azure DevOps hosted build agent and am using localdb for the build. Unfortunately, localdb does not support all SQL Server Enterprise Edition features. If you plan on creating changes for Enterprise Edition, including the use of online index creation, consider using a self-hosted build agent running the free SQL Server Developer Edition.
Save and run the pipeline.
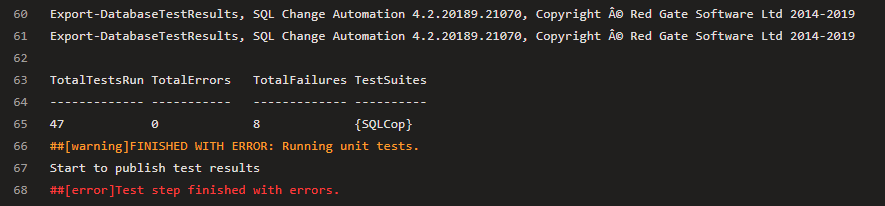
Confirm the build is successful, and that the test task succeeds in running tests (some of which may fail).
For this example, we are running all the built in tSQLt and SQLCop tests. Not all of these tests may pass-- but it is useful to prove that tests can fail! Look through the step output for the testing step.
The goal is to find the total number of tests run and the total failures, as in this screenshot:
You may choose to:
- Add and/or remove tests from your northwindtest project
- Customize the 'Test SQL Change Automation Project' operation in the future to only run specific test classes, which are the tests essential to pass in your environment.
This documentation contains proprietary information and is protected by copyright law.
Copyright © 2026 Red Gate Software Limited. All rights reserved


