Installing SQL Monitor components
Published 03 December 2012
Installing the SQL Monitor Web Server
Run the SQL Monitor installer on the computer that you want to host the Web Server.
If you choose to install only the Web Server, the installation wizard will finish once the Web Server is installed; otherwise the wizard will continue with options for installing the Base Monitor and Data Repository.
Choose whether to install the SQL Monitor Web Server or use an existing IIS Web server.
If your computer is already in use as an IIS Web Server, you can choose to configure IIS to add SQL Monitor. See Using SQL Monitor with IIS.
If this is not the case, you will need to install the SQL Monitor Web Server. The SQL Monitor Web Server is a self-contained XSP Web Server that runs using the .NET 3.5 SP1 runtime.
Select a TCP port for incoming connections to the Web Server. Use the default port of 8080 unless it is already in use.
If you are installing just the Web Server, click Finish to close the installation wizard and automatically open SQL Monitor in your browser.
We recommend that you copy the SQL Monitor URL link displayed on the final page of the wizard. It will be in the format http://<webserver>:<portnumber> (e.g, http://mymachine:8080). You can also launch a local installation by selecting Red Gate > SQL Monitor from the Start menu. If you've installed SQL Monitor on a different domain or subdomain, the fully-qualified machine name will be http://<webserver>.<domain>.com:<portnumber>.
SQL Monitor relies on the JavaScript engine of your web browser to interpret and execute JavaScript correctly. The engines used by certain browsers may not perform as well as others, and in turn this may affect the performance of SQL Monitor. Should you experience performance issues, try switching to one of the other supported browsers listed in Requirements.
If you are installing both components, the wizard will continue automatically with options for installing the Base Monitor service and Data Repository database. Alternatively, you can download the Base Monitor installer to another computer and install the Base Monitor and Data Repository.
Installing the SQL Monitor Base Monitor service
- Specify where to install the files that will run the service, and provide a writable folder for the configuration file.
The configuration file stores the location of the Data Repository and the connection string for accessing the database. The configuration file requires a writeable location so that it can be updated by SQL Monitor if you move the Data Repository database to a different SQL Server instance.
- Select a TCP port to use for communicating with the Web Server and the Data Repository.
Use the default port of 7399 unless it is already in use.
You now need to create a SQL Server database to use for the Data Repository, and ensure the Base Monitor service can connect to it.
Setting up the Data Repository
The SQL Monitor Data Repository requires an MS SQL Server 2005, 2008 or 2012 database to store all the data it collects from your monitored servers.
We recommend that you estimate the eventual size of your database using the guidelines described in Supported platforms and hardware guidelines, and use a SQL Server management tool to create a database with settings appropriate to your environment. You can then follow the instructions below on using an existing database.
If you are installing the Data Repository on a virtual machine, make sure that the SQL Server database is installed on a physical disk mapped to the virtual machine. Storing the Data Repository database on a virtual disk will affect performance and is not recommended.
Using an existing database for the Data Repository
If you have followed our recommendations and created a new database, it should be completely empty, i.e., it should not contain any tables.
You can also select a database created during installation of a previous version of SQL Monitor.
To specify your Data Repository database:
- Click Set Up Data Repository and then select Use an existing SQL Server database.
- Click Next, then select the SQL Server instance.
- In the Database box, select the database you want to use; databases on the SQL Server should be automatically detected, and appear in the list.
You can type an instance name or IP address directly into the Server box if the instance name does not appear in the drop-down list. - Click Next. SQL Monitor checks the database. Once the database connection has been confirmed, click Close.
To make sure CPU isn't wasted on monitoring files that don't need monitoring, we recommend that you configure your antivirus settings to ignore SQL Monitor database .mdf and .ldf files.
To create a new database for the Data Repository
To create the Data Repository, you need an account with Create Database permissions on the specified SQL Server. This account is used ONLY to create the database that SQL Monitor uses as its Data Repository. Once the Data Repository has been created, the credentials you enter here are not used by SQL Monitor.
- Click Set up Data Repository and then select Create a new SQL Server database.
- Click Next, then enter the SQL Server instance name.
You can type an instance name or IP address directly into the SQL Server box if the instance name does not appear in the drop-down list. - By default, SQL Monitor will create a database called
RedGateMonitor. To use a different name, in the Database box, type the name you want. - Under Create database using, choose one of the following:
- Use current credentials to use the account that you are currently logged into.
- Specify an account. If you select Windows authentication, SQL Monitor assumes this account is in the current domain. To use a different domain account, enter credentials in the format username@domain-name or domain-name\username. Enter the password.
Note: If you specify a different Windows account, and this account fails, SQL Monitor will automatically attempt to create the database using your current credentials. - Click Create Now to create the database. Once database creation has been confirmed, click Close. If you go back a page in the wizard, this will not undo the creation of the database.
If you don't have a login for the SQL Server with the correct permissions, use the sp_addsrvrolemember stored procedure to assign a login to the dbcreator role. More information about sp_addsrvrolmember.
If you see an "Invalid sequential schema version" or "Database is not empty...." error when creating the database, see Error messages: creating a Data Repository database.
If the error is related to permissions, make sure you have Create Database permissions on the specified SQL Server.
If you have antivirus software installed on your server, we recommend that you configure it to stop monitoring the folders where your SQL Monitor database .mdf and .ldf are stored; this can free up valuable CPU.
Connecting to the Data Repository database
The Base Monitor service requires credentials to connect to the database you just created in order to store and retrieve collected data. This account must have administrator privileges (db_owner database role) on the database.
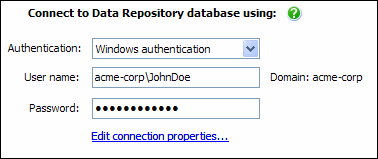
Windows authentication
If you connect to the database using Windows authentication, the Windows account you select will also be used to run the SQL Monitor Base Monitor service. If the account does not have permissions to run a Windows service, then it will be granted these permissions.
The user name defaults to your current domain. You can change the domain in the User name box using either of the following formats:
- mydomain\username
- username@mydomain
If this account does not have Log on as Service permissions, SQL Monitor will automatically attempt to grant them to the account.
If you select SQL Server authentication, the Base Monitor service will run as Local Service.
SQL Server authentication
You can connect to the database using SQL Server authentication. If you provide SQL Server login credentials, the Base Monitor service will run under the Local Service account.
If you encounter an error message when connecting to the database, see Account permissions required.
Error and feature usage reporting
SQL Monitor can send data back to Red Gate about the features you use and any application errors you encounter. This helps us to improve SQL Monitor for future releases.
Data is anonymized before we receive it, and no confidential, sensitive or commercial information is sent to us.
- If you are happy to report errors, turn on the Send error reports check box, and optionally enter your email address. We will only contact you in the event of an error for which we require further information, to help us eliminate bugs.
- If you are happy to report feature usage, turn on the Send feature usage data check box.
Summary
- Review all your installation options on the Summary page. If you want to change anything, use the Back button to edit the required page.
Note: Once your database for the Data Repository has been created, it will not be deleted if you go back and set up a different Data Repository. - Click Install to start installing SQL Monitor using the selected settings.
- When installation is complete, click Finish to launch SQL Monitor in your web browser. You can also launch SQL Monitor by selecting Red Gate > SQL Monitor from the Start menu.
What next?
To start using SQL Monitor, you first need to create an Administrator password to use when logging in to the SQL Monitor pages. See Creating the Administrator role.
This documentation contains proprietary information and is protected by copyright law.
Copyright © 2026 Red Gate Software Limited. All rights reserved


