6.2 Deploying Your Changes via Azure DevOps
Published 09 September 2024
Now that you've committed your migration scripts to the hosted repository, it's time to set up continuous integration and deployment (CI/CD) using Azure DevOps. This setup allows your database changes to be automatically applied across all environments, ensuring a smooth deployment process.
Tip: These YAML pipelines read from the Flyway project to know the locations of the target databases! When provisioning your databases, we updated the connections in Flyway Desktop to point to the newly created databases. If the pipeline encounters issues finding a database, double-check that your Flyway project has the correct and working connections to these databases. Refer back to Provisioning your Databases for more details and troubleshooting tips.
Step 1: Set Up an Azure DevOps Project (If Not Already Done)
If you haven't already set up an Azure DevOps project or imported your repository, head back to the Getting Your Repository Ready steps to ensure everything is configured properly.
Step 2: Setting Up an Azure DevOps Agent
- Provision an Agent:
- To run the pipeline, you need an Azure DevOps Agent that can access the databases you provisioned earlier. The Agent must have connectivity to these databases, whether they are on localhost, a VM, or another server.
- For more details on setting up an agent, refer to the official Azure DevOps agent documentation.
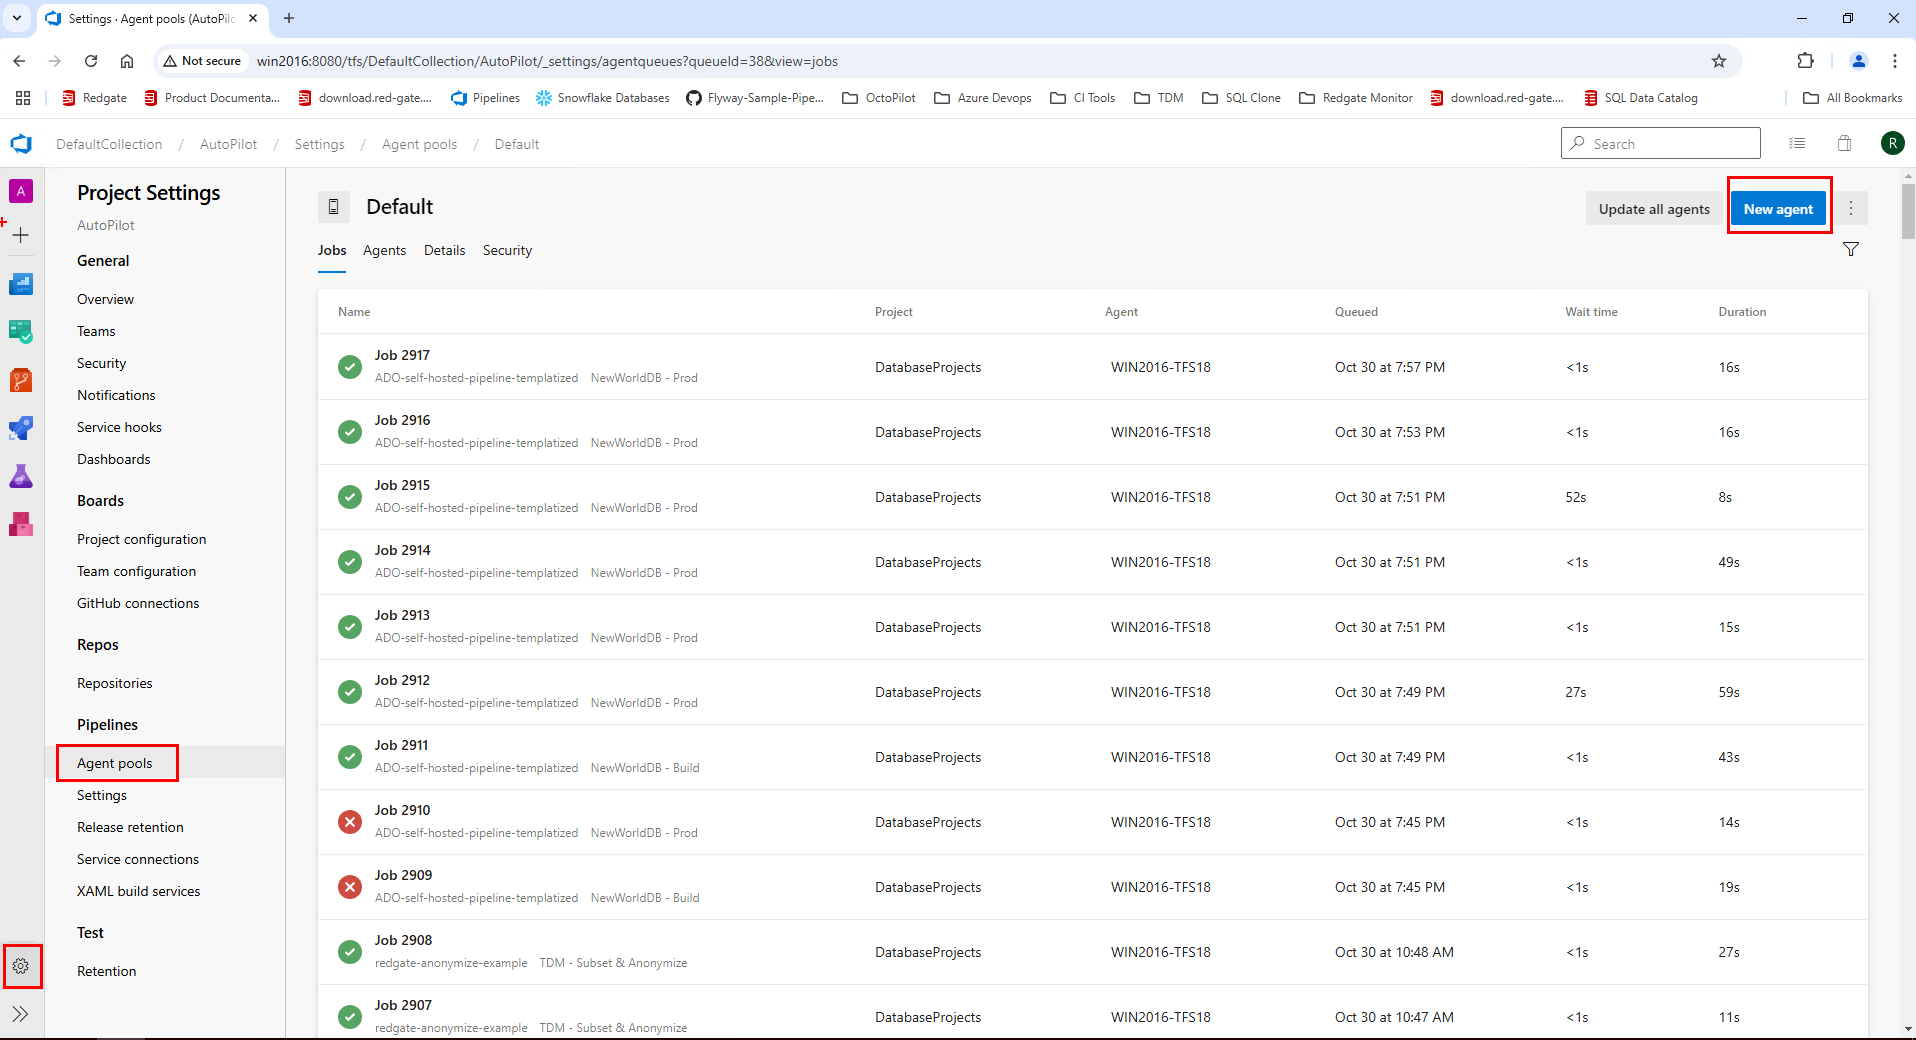
- If you haven't setup an agent before, simply go to Project Settings > Agent Pools > Click Default or Create a new pool > Select New Agent
Step 3: Authenticating with Flyway (Creating a Personal Access Token)
Set Up a Personal Access Token (Click here for more details)
A valid Flyway License is required in order to authenticate Flyway within a pipeline. The most secure and industry standard way of doing this is through setting up a Personal Access token, linked to your Redgate Portal account.
- Step 1: Navigate to https://identityprovider.red-gate.com/personaltokens
- Step 2: Login with your Redgate Portal account
- This should link to the Redgate Account used when starting your trial within Flyway Desktop.
- If you're still unaware which account to use, navigate back to Flyway Desktop and validate which account was used or sign up for a new trial.
- Step 3: Click '+ New Token' to create a new Personal Access Token
- Ensure you save this somewhere, like a password manager, as there's no method of seeing the token again in future.
- Treat this token just like any other secure password you use. If the token is lost, or compromised, simply choose to revoke the token and create a new one.
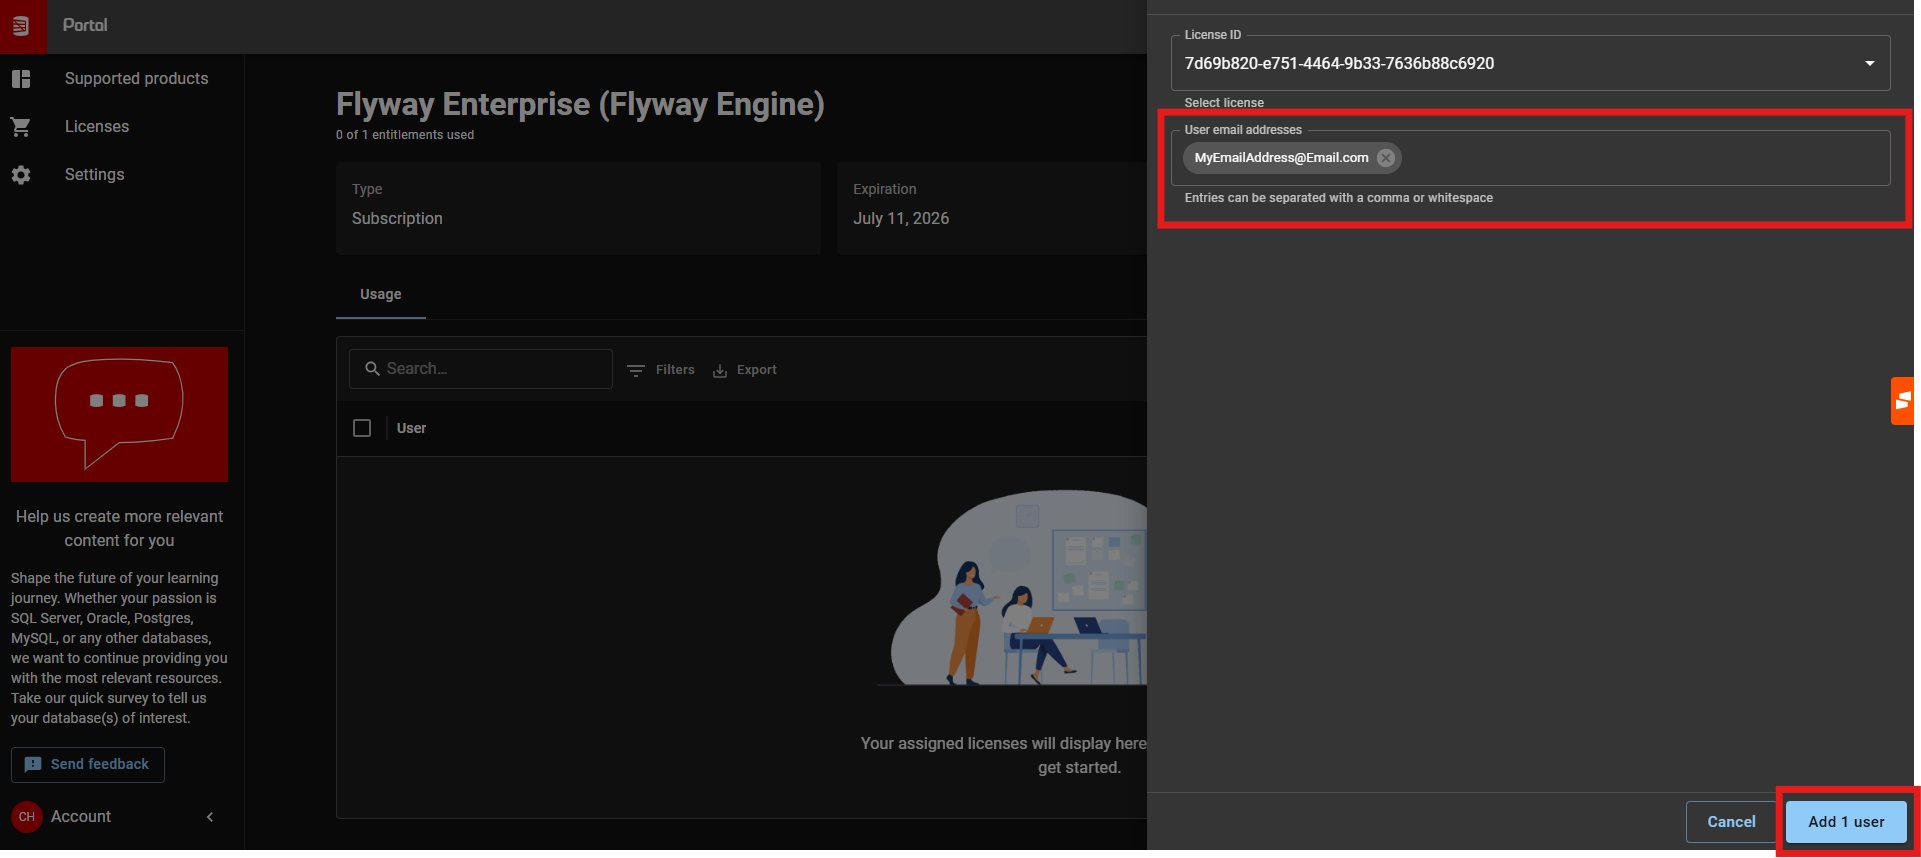
- Step 4: Navigate to the Redgate Portal website (Where you can see all licenses linked to your account) - https://portal.red-gate.com/licenses
- Step 5: Select Flyway Enterprise from the list (You may need to select 'Licenses on the left hand side menu to see it)
- If the Flyway Enterprise trial was started through Flyway Desktop, your Email Address will automatically have been allocated to the license 'Flyway Desktop Enterprise'.
- Step 6: Ensure the license is allocated to your email address. To do this, click '+ Allocate' > Enter your email address > Click Add User'
Note - Keep your PAT saved securely, as it will be configured in the next step
Step 4: Setup the pipeline
Create the Pipeline:
- In Azure DevOps, go to Pipelines and click Create Pipeline (If this is not your first pipeline, simply click 'New Pipeline' in the top right hand corner instead)

- Choose Azure Repos Git and select the repository you created (by default, it’s named FlywayAutoPilot).
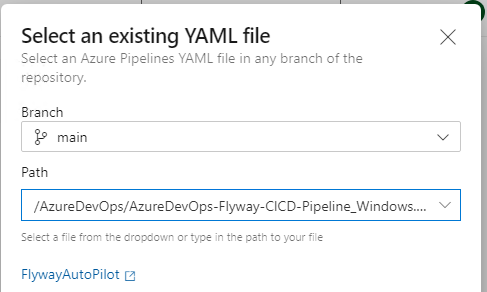
- Select Existing Azure Pipelines YAML File and choose the YAML file correct for you, you will find several YAML scripts clearly labeled with an OS suffix based on the operating system of your agent (e.g., AzureDevOps-Flyway-CICD-Pipeline_Windows.yml, AzureDevOps-Flyway-CICD-Pipeline_Linux.yml)..
- In Azure DevOps, go to Pipelines and click Create Pipeline (If this is not your first pipeline, simply click 'New Pipeline' in the top right hand corner instead)
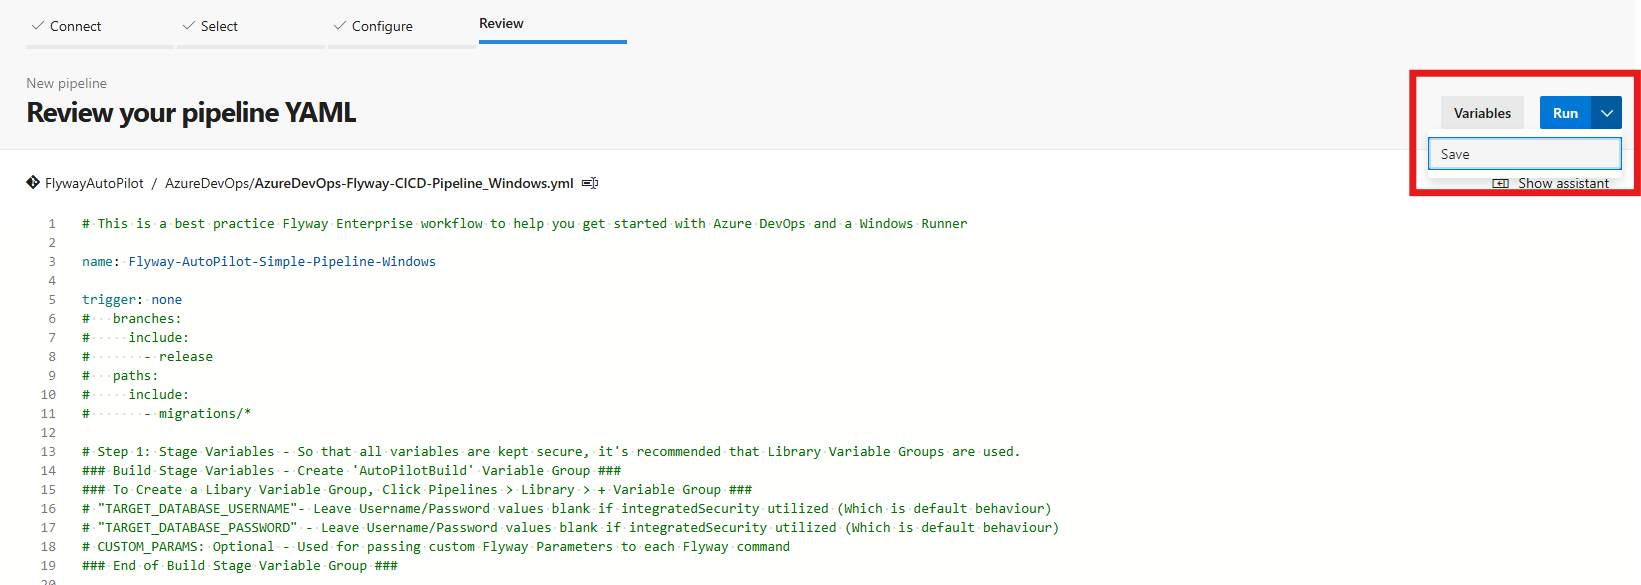
Edit the Azure DevOps YAML Pipeline:
- Using the Azure DevOps YAML editor, we can now review and configure any custom environmental variables as required. That said, the pipeline has been designed with simplicity at it's heart, therefore minimal configuration will be required, with the key environmental values stored outside of the pipeline and configured in the following step.
- Optional - Workflow Configuration Steps
- Hosted Agents - When a Microsoft Hosted agent is used, this typically means a vanilla Windows or Linux machine is spun up to deploy the pipeline on each run. In this scenario, the Flyway CLI WILL need to be installed for the pipeline to run. To deal with this, simply change the variable 'FLYWAY_CLI_INSTALL_CHECK' to 'true'

- Save the pipeline and move onto the next step
- If you click run, expect to see an error indicating that the Variable Group 'AutoPilotGlobal' could not be found. This is not an issue and will be addressed in the next section
- Library Groups (Keeping your sensitive information secure)
- In order to automate database deployments with Flyway, it's important for our pipeline to provide Flyway with key (Often secure) details such as where your database is and how to connect to it. Therefore, one of the best ways to do this (whilst keeping your security team happy), is by using Library Variable Groups (Click here for details).
- The pipeline YAML has been designed to look for 4 Variable Groups, AutoPilotGlobal/AutoPilotBuild/AutoPilotTest/AutoPilotProd, all of which need to be created for the pipeline to run.
- For groups AutoPilotBuild/Test/Prod, the variables are OPTIONAL, therefore for most setups the values can be left empty. It is still useful to create the names so that it's easier to utilize them in future if needed, or to clone these groups for use with additional databases you may onboard in future.
- To create a variable group Click Pipelines → Library → '+ Variable Group' and make all 4 of the below named groups:
- AutoPilotGlobal
Name Example Value Description FLYWAY_EMAIL MyEmail@Email.com Enter the email address linked to the Redgate Account that created the PAT
FLYWAY_TOKEN J2n75xhv4pb5rqva5hccbjyzdu2uru7hqptn5eytc6bdejcn6r4b
Enter the secure PAT created in the section above. This token should be treated like any other password.
FLYWAY_AUTH_DISABLED false
This is an OPTIONAL variable that will disable the Flyway Authentication step if set to true. This is valuable for scenarios where offline permit activation is utilized, which results in the Auth variable then becoming unnecessary.
FLYWAY_CLI_INSTALL false OPTIONAL - By default this check is off, with value false or empty. Set to true to enable a Flyway CLI validation on the runner, which will validate Flyway is installed and if not will download and install to the desired version (Default being latest available release). AGENT_POOL Default
This should match to the Agent Pool name to be used by the pipeline (By default new agent pools are called default. Or for Microsoft Hosted agents ubuntu-latest/windows-latest)
- AutoPilotBuild
Name Example Value Description TARGET_DATABASE_USERNAME MySecureUsername OPTIONAL - By default for SQL Server projects, Windows Auth is used for database connections. Which makes this variable redundant and can be left empty. For other authentication types, it's important to specify the User account used by Flyway to connect to the target database TARGET_DATABASE_PASSWORD MySecurePassword OPTIONAL - By default for SQL Server projects, Windows Auth is used for database connections. Which makes this variable redundant and can be left empty. For other authentication types, it's important to specify the Password for the above User account used by Flyway to connect to the target database CUSTOM_PARAMS -X OPTIONAL - By default the database connection details are taken from the project Flyway.toml and the above user/password variables (Where relevant). However, there are times where additional custom Flyway parameters may be required. For example, enabling Flyways debug functionality which is enabled by passing -X on the command line. Other examples could be providing a custom URL that takes precedent over the URL in the toml.
- AutoPilotTest & AutoPilotProd (Top tip - Once AutoPilotBuild is created, simply click 'Clone' at the top of the library group to save time)
Name Example Value Description TARGET_DATABASE_USERNAME MySecureTargetUsername OPTIONAL - By default for SQL Server projects, Windows Auth is used for database connections. Which makes this variable redundant and can be left empty. For other authentication types, it's important to specify the User account used by Flyway to connect to the target database. TARGET_DATABASE_PASSWORD MySecureTargetPassword OPTIONAL - By default for SQL Server projects, Windows Auth is used for database connections. Which makes this variable redundant and can be left empty. For other authentication types, it's important to specify the Password for the above User account used by Flyway to connect to the target database REPORT_DATABASE_USERNAME MySecureReportUsername OPTIONAL - By default for SQL Server projects, Windows Auth is used for database connections. Which makes this variable redundant and can be left empty. For other authentication types, it's important to specify the User account used by Flyway to connect to the reporting database. REPORT_DATABASE_PASSWORD MySecureReportPassword OPTIONAL - By default for SQL Server projects, Windows Auth is used for database connections. Which makes this variable redundant and can be left empty. For other authentication types, it's important to specify the Password for the above User account used by Flyway to connect to the reporting database. CUSTOM_PARAMS -X OPTIONAL - By default the database connection details are taken from the project Flyway.toml and the above user/password variables (Where relevant). However, there are times where additional custom Flyway parameters may be required. For example, enabling Flyways debug functionality which is enabled by passing -X on the command line. Other examples could be providing a custom URL that takes precedent over the URL in the toml.
- AutoPilotGlobal
Security Tip: Whilst you can put secure values inline for testing, we strongly recommend moving any secure information into a secure variable or variable group for production implementation.
Step 5: Run the Pipeline
Once the pipeline definition is setup, simply click Save & Run in the top right hand side box.
Next Steps
Now that you’ve set up your end-to-end Database DevOps process with Flyway, it’s time to dive in! Start creating interesting changes within Flyway Desktop and watch as they are version-controlled in your chosen Git tool. Then, follow these changes as they flow automatically through each environment, complete with detailed check reports showing all pending updates. With Flyway, you’re on your way to becoming a Database DevOps expert!
This documentation contains proprietary information and is protected by copyright law.
Copyright © 2026 Red Gate Software Limited. All rights reserved


