Backing up and restoring Deployment Manager
Published 24 February 2014
So you can restore Deployment Manager in case of a problem, you should back up Deployment Manager's configuration, data, history and package feeds. To do this:
- Back up Deployment Manager's database
- Back up the Red Gate Deployment Manager database encryption certificate
- Back up the package feeds
You can use backups or snapshots of the entire server running Deployment Manager to back up your installation. If you do this, make sure Deployment Manager is set to take regular automatic backups of its database, and take regular backups of external package feeds. After restoring the server, restore the most recent backup of the Deployment Manager database then restore any external package feeds.
1. Back up the Deployment Manager database
Deployment Manager uses a RavenDB database to store its configuration, data and history. By default, Deployment Manager backs up this database every 24 hours to the location set on the Backup Settings page (by default, C:\ProgramData\Red Gate\DeploymentManager\Data\Backups).
To change Deployment Manager backup settings:
In Settings, click Database backups > Change backup settings.
- Use the Backup Settings page to:
- Change the folder the database is backed up to
- Change the backup schedule
- Disable automatic backups (not recommended):

We recommend you move the backup files to a different server from the server running Deployment Manager.
If you disable automatic backups, you can still take backups of the database manually on the Database Backups page.
2. Back up the Red Gate Deployment Manager database encryption certificate
Deployment Manager uses public/private key cryptography to encrypt SQL Server passwords and masked variables in its database so that only the Deployment Manager Windows service can read them. The keys are stored in a certificate named Red Gate Deployment Manager database encryption and kept in the Red Gate Deployment Manager certificate store which is in the Windows Certificate Store.
So you won't lose access to the encrypted data, export a copy of the certificate and save it to a secure location:
Set up the Certificates Snap-in in Microsoft Management Console
Click the Windows Start button, type mmc, and press Enter to open Microsoft Management Console.
- Click File > Add/Remove Snap-in.
The Add or Remove Snap-ins dialog is displayed. - Select Certificates from the list of available snap-ins and click Add.
- Select Computer account and click Next.
- Accept the default: Local computer, and click Finish.
The Certificates snap-in is selected: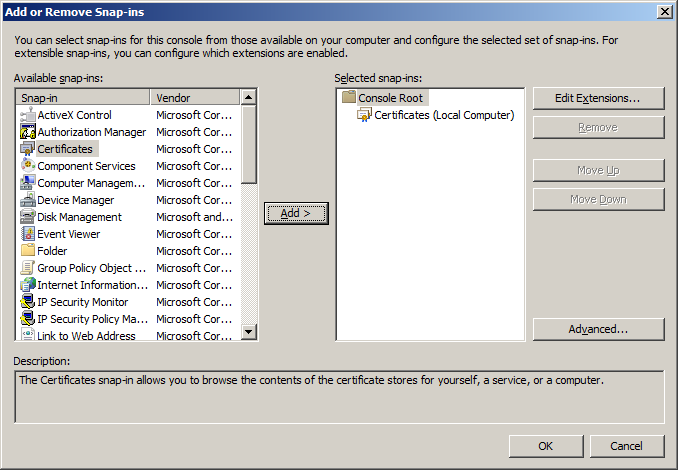
- Click OK.
Export the certificate
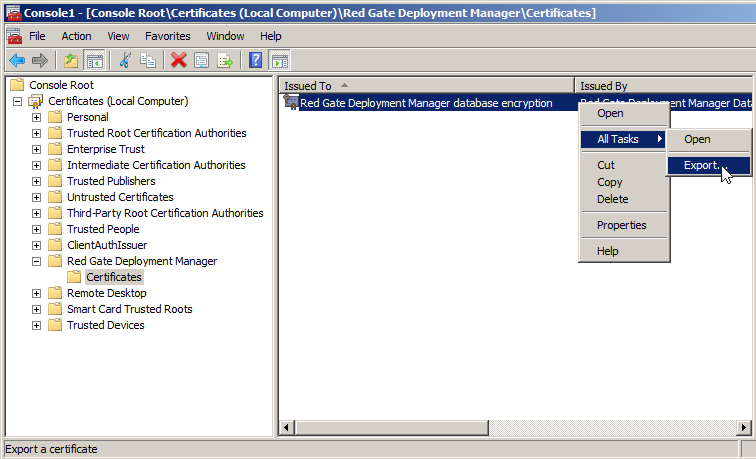
- In the Certificates Snap-in, expand Certificates (Local Computer) > Red Gate Deployment Manager > Certificates
- Right-click the Red Gate Deployment Manager database encryption certificate and click All Tasks > Export:
- Click Next.
- Select Yes, export the private key and click Next.
- Accept the default: Personal Information Exchange - PKCS #12 (.PFX), and click Next.
- Set a password and click Next.
You'll need this password to import the certificate into a new server if you restore Deployment Manager. - Specify a path and file name for the .pfx file. This file will be created and the certificate will be exported to it. Click Next.
- Review the settings and click Finish.
We recommend you move the .pfx file to a different server from the server running Deployment Manager.
3. Back up the package feeds
If you're using the Deployment Manager package feed, we recommend you take regular copies of the feed folder where the packages are stored.
Packages are stored in the Data\feed folder. The path of the Data folder is set in the Windows registry under HKEY_LOCAL_MACHINE\SOFTWARE\Red Gate\Deployment Manager\Storage.Path
If you're using package feeds other than the Deployment Manager package feed, refer to the documentation from the software provider for how to back them up.
Restoring Deployment Manager
To restore Deployment Manager to a new server, do the following:
- Install Deployment Manager
- Restore the Deployment Manager database
Restore the Red Gate Deployment Manager database encryption certificate
- Restore the package feeds
- Activate Deployment Manager
- Check the configuration has been restored successfully
1. Install Deployment Manager
Before you can restore the data and settings from your previous installation, you first need to reinstall the Deployment Manager application. To do this:
- Download the free Starter Edition of Deployment Manager from the product page.
- Follow the instructions in Installing up to step 10.
Existing user accounts will be restored to the new server; you don't need to set up an administrator account after installing.
2. Restore the Deployment Manager database
To restore the database from a backup, use the Raven.Smuggler command line tool included with Deployment Manager:
- Find the most recent backup file to restore.
- Copy the backup file to the server running Deployment Manager. Make sure the Red Gate Deployment Manager service is running.
Start a command prompt as administrator. Change directory to the Server folder in the installation folder of Deployment Manager.
By default, the installation folder is C:\Program Files (x86)\Red Gate\Deployment Manager
- On the command prompt, run:
Raven.Smuggler in http://localhost:10300 <path to backup file>
This will restore your user accounts, configuration, projects and history.
3. Restore the Red Gate Deployment Manager database encryption certificate
To restore the certificate, delete the existing certificate on the new server, then import the .pfx file using the Certificates Snap-in so that it's in the the same location as the previous certificate. To do this:
- Make sure the .pfx file is accessible from the new server.
- Open the Certificates Snap-in on the new server (see Set up the Certificates Snap-in in Microsoft Management Console above).
- In the Certificates (Local Computer) > Red Gate Deployment Manager > Certificates folder, right-click the Red Gate Deployment Manager database encryption certificate and click Delete.
- Right-click on the Certificates (Local Computer) > Red Gate Deployment Manager > Certificates folder and click All Tasks > Import.
- Click Next.
Specify the name and path of the .pfx file (see the Export the certificate section above), and click Next.
Type the password you set in step 5 of the Export the certificate section above, select Mark this key as exportable and click Next.
- Accept the default: Place all certificates in the Red Gate Deployment Manager certificate store, and click Next.
- Review the settings and click Finish.
4. Restore the package feeds
If you're using the Deployment Manager package feed, copy the contents of the feed folder you backed up to the Data\feed folder in your new installation.
The path of the Data folder is set in the Windows registry under HKEY_LOCAL_MACHINE\SOFTWARE\Red Gate\Deployment Manager\Storage.Path
If you're using package feeds other than the Deployment Manager package feed, refer to the documentation from the software provider.
5. Activate Deployment Manager
If you have a licensed copy of Deployment Manager, do the following:
- Log in to Deployment Manager with an administrator account.
- On the Settings page, click Licensing.
- Under Serial number, enter the serial number and click Activate.
To find your serial number, go to http://www.red-gate.com/myserialnumbers and log in with the email address and password that were used to buy the product.
6. Check the configuration has been restored successfully
Check the Environments, Projects, SQL Servers, target machines, package feeds and deployment history have successfully been restored.
If you have any problems, contact support.


