Installing on VMs running Ubuntu or RHEL
Published 05 September 2023
Redgate Clone makes it easy to create disposable copies of SQL Server, Oracle, PostgreSQL and MySQL databases for development and test. The database copies are hosted in a centralized environment so you don't need database servers installed locally.
You can create, save and destroy your databases as often as you like, even spinning up multiple copies for different branches and CI pipelines. It uses a command line interface, making it simple to script and automate in DevOps pipelines.
Redgate Clone is designed to scale to meet your requirements making it easy to get started with minimal resources and increase these as you expand usage. This section will guide you through setting up a first proof of concept (POC), for more detailed information on installation please see the installation guide.
Contents
Supported database engines
Redgate Clone currently supports the following database engines:
| Engine | Version |
|---|---|
| Microsoft SQL Server | 2019, 2022 |
| PostgreSQL | 11, 12, 13, 14, 15 |
| MySQL | 8 |
| Oracle | 19c SE (19.3), 19c EE (19.3) |
Installing Redgate Clone for the first time
Redgate Clone is installed on a central server that users connect to via a command-line interface (CLI). It's designed to be scalable, so you can start off small and increase resources as usage grows. As a starting point, we recommend 16GB RAM and 100GB of storage. This will allow for a single data-image from a small backup and several data-containers to be created and run in parallel. You will need to increase RAM and storage as you start working with more data-images and data-containers, and larger backups.
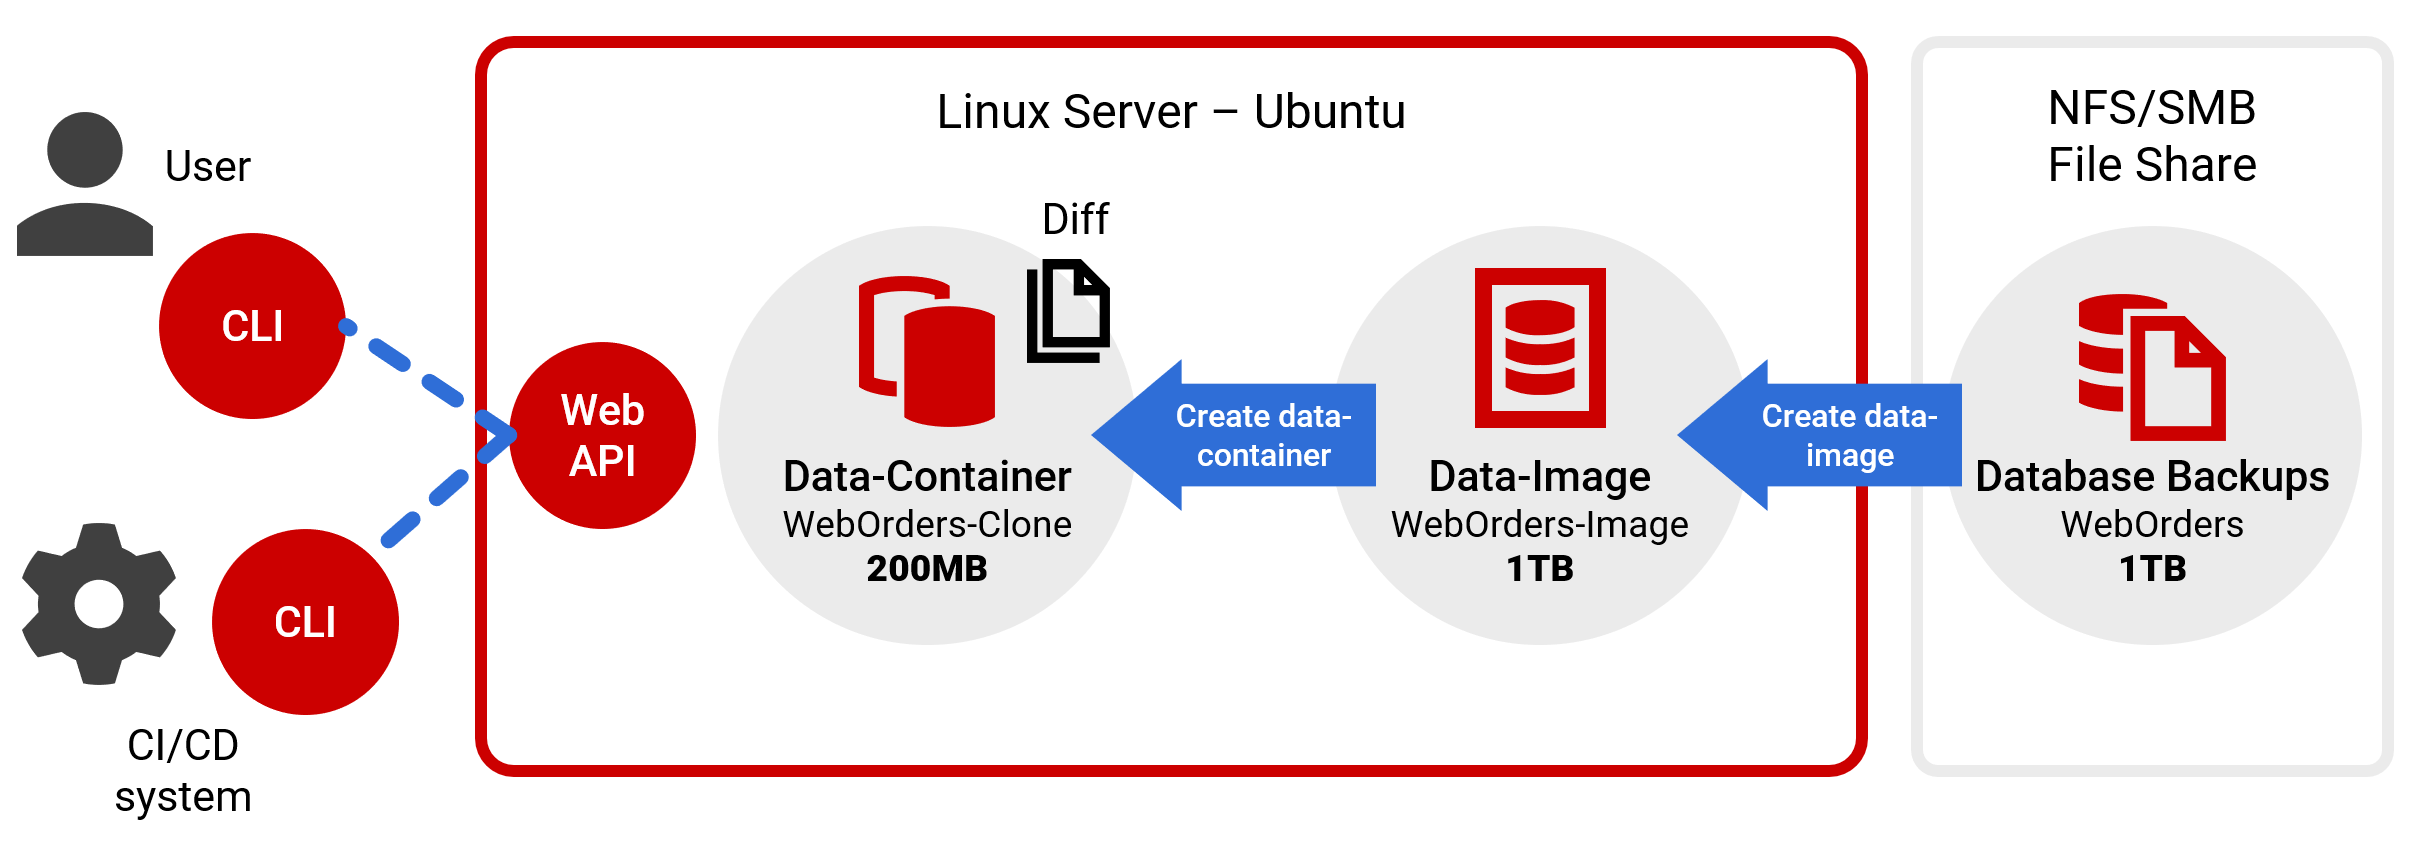
Redgate Clone architecture
Technical prerequisites
We have some sample Terraform with instructions available for Azure that will create the necessary infrastructure as described below.
Virtual Machine
Redgate Clone is installed on a single server which will need to be scaled depending on usage. The specification below is a good starting point and will enable you to get Redgate Clone up and running and create your first clones. As you start creating more clones and working with larger backups, you will first need to increase RAM and disk(s) size, and we advise planning ahead for this – information on scaling is provided at the end of this guide.
| Type | Requirements | Details |
|---|---|---|
| OS | Ubuntu or RHEL | For Ubuntu, it must be:
For RHEL:
|
| User permissions | The user running the installation will need to be root or have sudo access to the machine. | |
| CPU | 8 vCPUs | |
| RAM | 16 GB | The memory defines how many data containers can be hosted in parallel & how many storage disks can be attached. For a first proof of concept (POC) we recommend starting with 16GB. This will allow for a single data-image and several data-containers to be created and run in parallel. |
| OS Disk | 80 GB | WARNING The partition table should be labelled as GPT (GUID Partition Table) and not MBR (Master Boot Record). See the next step for more information. When using Azure:
When using AWS:
|
| Additional empty disks | 100 GB | These disks are used to store data images and data containers (clones). For a first proof of concept (POC) we recommend using a small sample backup to keep the disk requirements small. |
File share
To create database copies from backups you will need to store the backup files in an accessible shared folder, which can be either an NFS or SMB file share. Configuring a file share is covered in part 2 of the installation steps below, but you may want to learn about backup storage in advance.
| Protocol | Details |
|---|---|
| NFS | NFS versions 3 and 4 are supported |
| SMB | All versions |
Network & Firewall
Redgate Clone does not support changing the IP address of the VM once it has been installed. For this reason, Redgate Clone requires a static IP address. If your network uses a DHCP server to assign IP addresses, you should add a reservation so that your nodes' IP addresses do not change.
The following ports should be available on the host.
| Port | Purpose |
|---|---|
| 8800 | Admin Console |
| 8132 | Web API used by the CLI. |
| 32767-60000 (by default) | Range of ports to randomly select from for new data containers. |
Other
| What | Notes |
|---|---|
| DNS | Valid (public or private) DNS Name (FQDN – Fully Qualified Domain Name) This will need to be a CNAME record that redirects to the Virtual Machine running the Redgate Clone. DNS name, which is resolvable publicly, or in your company's network, simplifies Using the CLI usage for your employees, and also allows us to use TLS certificate to secure comms. For AWS, if you use the default DNS values from an EC2 instance, please use the public DNS. |
| TLS Certificate | If you decide not to use self-signed certificates generated via Redgate Clone, you will need to provide a TLS Certificate (e.g.
|
| Kernel configuration | The following kernel configuration values should be set:
See the following troubleshooting articles for more information on how to change these values: |
| License | You will need an application license, which will be sent to you by email. Please contact sales@red-gate.com if you haven't received your Redgate Clone license. |
Installation steps
Redgate Clone is a two-part installation. The first stage configures the virtual machine, and the second stage completes the setup of Redgate Clone. You should allow 40-60 mins for installation to complete.
Part 1: Configuring the VM
Make sure you have a machine ready based on the prerequisites above. You can check this manually by following our documentation or run a prerequisites check script with the following command:
curl -sSL https://rd.gt/3RL6ioU | sudo bash
To begin configuration run the following command in the VM:
curl -sSL https://k8s.kurl.sh/cloning-capability-app | sudo bash
When asked about disabling swap to continue, press ‘Y’
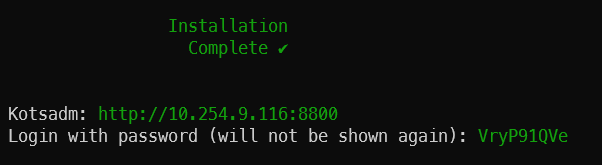
You will need the URL and temporary password generated by the installer for the second stage, so note these down. For example:
Once completed, reload the bash shell:
bash -l
- Check that you can access the Kubernetes cluster on the VM through
kubectl:- Running
kubectl get podsshould return a short list of pods. If you get an error like:
error loading config file "/etc/kubernetes/admin.conf": open /etc/kubernetes/admin.conf: permission deniedyou should unset theKUBECONFIGfile by running the following command:echo unset KUBECONFIG >> ~/.bash_profile bash -l
- Running
Finish configuring the VM by running the following commands:
kubectl label nodes redgate.com/infrastructure-node=true --overwrite --all
kubectl label nodes redgate.com/cloning-node=true --overwrite --all
kubectl label nodes redgate.com/cloning-mssql-node=true --overwrite --all
kubectl label nodes redgate.com/cloning-oracle-node=true --overwrite --all
Part 2: Complete setup
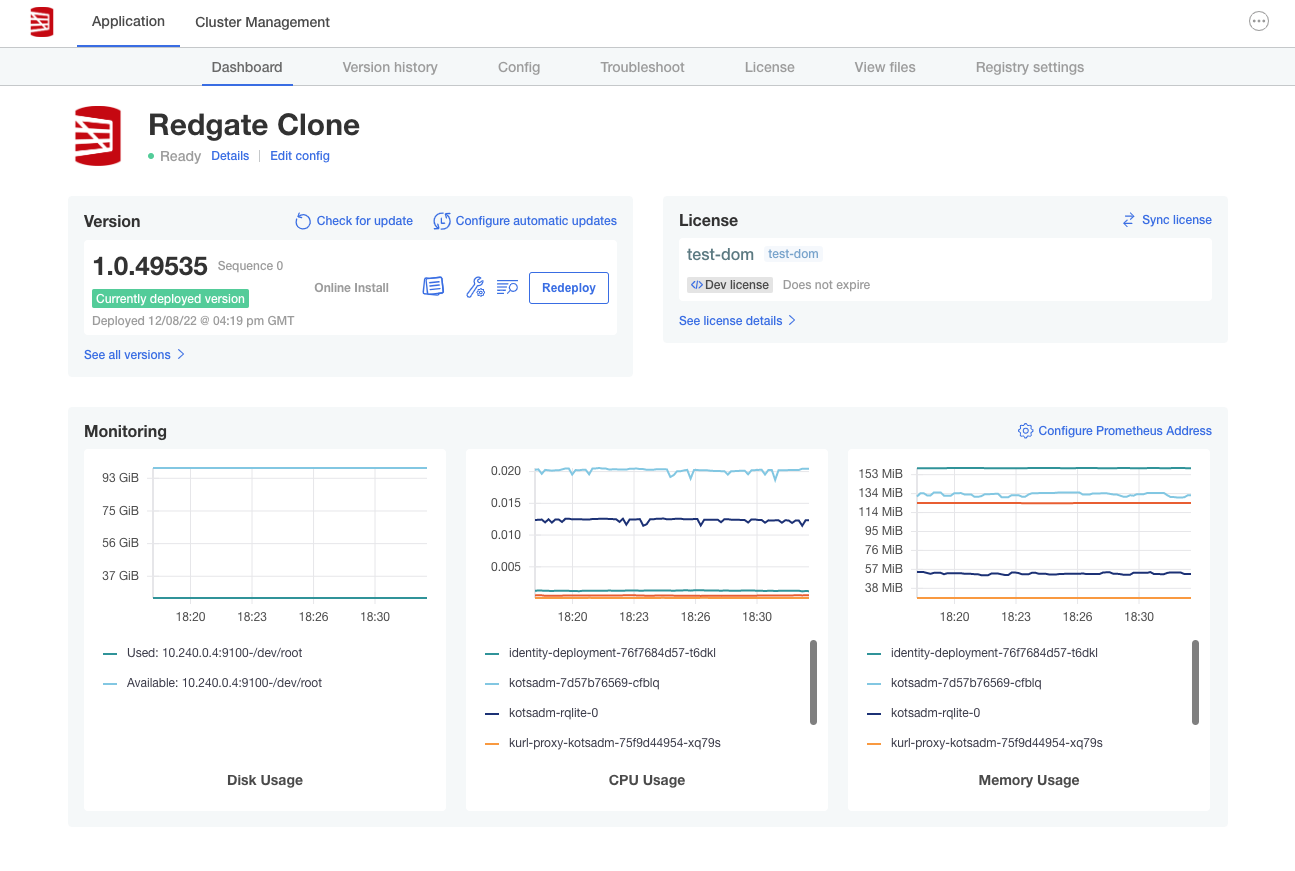
You'll use the Redgate Clone Admin Console to complete the setup, using the URL and temporary password you recorded from the previous steps. The Admin Console is also where you'll be able to monitor, configure settings, and install updates for Redgate Clone.
Go to the Admin Console web UI ( http://<IPv4 address>:8800 ) and follow the steps for completing installation of Redgate Clone:
- Install the latest version of Redgate Clone
- You will first be prompted to enter the password you recorded previously
- Next, you will need to upload the application license file. Please contact sales@red-gate.com if you haven't received a link to download your Redgate Clone license.
- From the Admin Console click on the Config tab from the navigation bar.
- In the Authentication Settings section, set the rgclone Access Token
- Create a secure password for the access token that will be used to secure communications to the CLI. This is defined by you.
- In the Data Image and Data Container Storage Settings section, specify a host directory and name pattern for the directory where data images and data containers are going to be stored. For more information see data storage.
- Configure the Communication security section
- Set your DNS (as defined previously)
Choose certificate source. You can use a self-signed certificate to get started quickly, or provide a TLS certificate to ensure all communications are secure
If you chose to use a self signed certificate, it will be generated for you. In a subsequent step you will need to export the certificate for distribution to end users.
- In the Authentication Settings section, set the rgclone Access Token
- You can optionally setup Admin Console TLS to enforce secure connections.
Linking your file share
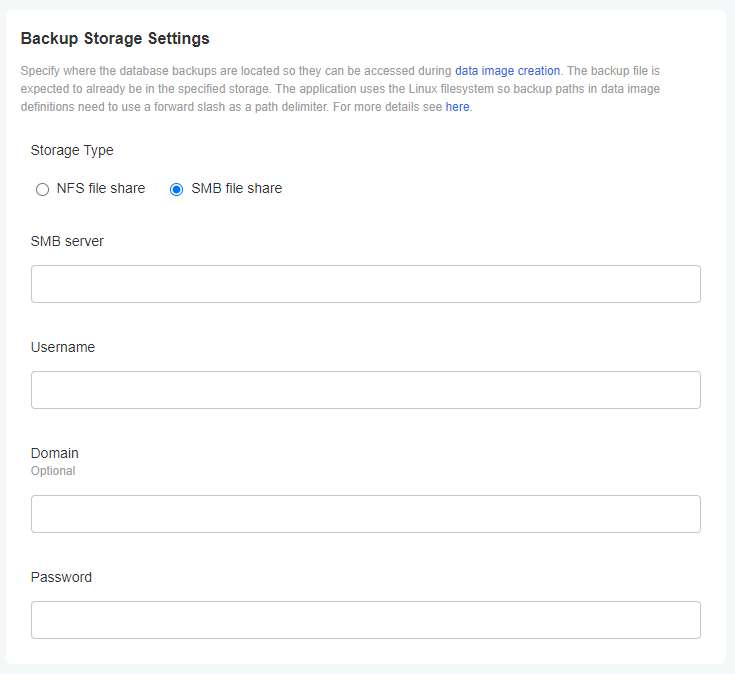
From the Admin Console click on the Config tab from the navigation bar, then go to the Backup Storage Settings section.
To create data images from backups you will need to store the backup files in an accessible shared folder, which can be either an NFS or SMB file share. The file share will be mounted into the application and the backup files will be read directly from there to create a data image.
You can learn how to configure NFS and SMB files shares by following these links:
You will be able to get started without a file share as Redgate Clone enables the creation of empty data images. An empty data image is a running instance with no content in it, which you can update through creating a data container.
Setting up OIDC (Optional)
From the Admin Console click on the Config tab from the navigation bar, then go to the OpenID Connect section.
If you want to use OIDC, check OIDC Enabled.To enable redgate Clone to use an OIDC-enabled identity provider, click on the Config tab from the navigation bar in the Admin Console and select OpenID Connect (OIDC) Settings from the menu.
You’ll need to enter a few values that you’ll find in your OIDC-enabled identity provider’s configuration page.
- The OpenID provider configuration path. This is the URI pointing to the identity provider’s
/.well-known/openid-configurationmetadata. (Where to find: Okta, Azure AD). - The client ID of your identity provider application (Where to find: Okta, Azure AD).
- The audience for your access token, contained within the
audclaim of the token. (Where to find: Okta, Azure AD). - Any additional scopes that may be required for an authentication request. This is optional dependent on your identity provider. Azure AD, for example, requires an additional API scope, which would then be added here. Okta has no such requirement.
- The username claim name that represents a unique username in your identity provider. The value contained in this claim within the access token will be attached to a resource, and will appear in any CLI output that shows a specific user (e.g. the image owner). Defaults to
preferred_username. (For more information about claims: Okta, Azure AD).
Learn more about authenticating with OpenID Connect (OIDC).
Exporting an auto-generated TLS certificate (Optional)
If you chose to use a self-signed certificate, all end users of Redgate Clone will need to have their machine trust that certificate.
To do this, first go onto the VM and extract the certificate, saving it to a file called rgclone.crt :
kubectl get secrets/redgate-platform-ca -n redgate-clone-app -o jsonpath='{.data.tls\.crt}' | base64 --decode > rgclone.crt
Then, to install the certificate on an end user machine, first copy the rgclone.crt file to it from the VM. Then run:
# Requires an elevated Powershell session (i.e. "Run as Administrator")
Import-Certificate -FilePath rgclone.crt -CertStoreLocation Cert:\LocalMachine\AuthRoot
cp ./rgclone.crt /usr/local/share/ca-certificates/rgclone.crt
sudo update-ca-certificates
cp ./rgclone.crt /etc/pki/ca-trust/source/anchors/rgclone.crt
sudo update-ca-trust
Connecting to Redgate Clone
Installing the CLI
You interact with Redgate Clone using our Command Line Interface (CLI) rgclone, which is hosted directly in the server and can be downloaded via our Web API (through a download endpoint). This also means that installation and upgrades are basically identical as they require this download to your local machine.
Supported operating systems (OS):
- windows-amd64
- linux-amd64
Select the instructions for the OS that you are installing the CLI onto here:
Set
rgcloneendpoint in PowerShell based on the web API: (replacing<rgclone-fqdn>with the DNS configured earlier)# Set the variable for the current terminal $Env:RGCLONE_API_ENDPOINT = 'https://<rgclone-fqdn>:8132' # Make available for subsequent terminals [Environment]::SetEnvironmentVariable('RGCLONE_API_ENDPOINT', $Env:RGCLONE_API_ENDPOINT, 'User')Download
rgcloneusing the endpoint set in the previous step. For Windows this will be a zip file containing thergcloneexecutable that you can download and extract, for example:Invoke-WebRequest -Uri "$Env:RGCLONE_API_ENDPOINT/cloning-api/download/cli/windows-amd64" -OutFile "windows-amd64.zip" Expand-Archive -Path "windows-amd64.zip" -DestinationPath "."
Set
rgcloneendpoint in your environment based on the web API: (replacing<rgclone-fqdn>with the DNS configured earlier)# Set the variable for the current terminal export RGCLONE_API_ENDPOINT=https://<rgclone-fqdn>:8132 # To make this environment variable persistent you could, for example in bash: echo "export RGCLONE_API_ENDPOINT=$RGCLONE_API_ENDPOINT" >> ~/.bash_profile
Download
rgcloneusing the endpoint set in the previous step. For Linux it will be atar.gzfile that you can extract, for example:curl $RGCLONE_API_ENDPOINT/cloning-api/download/cli/linux-amd64 | tar xz
Authenticate rgclone using the access token you configured in the Admin Console.
Once you have the rgclone CLI installed and configured on your local machine you're ready to start creating copies of your database instances.
Key concepts
Data image
A data image is the static template or blueprint for clones. It's a complete, point-in-time copy of a database instance, and can be configured with or without databases. The data image is defined in a single yaml file, which contains all the instructions necessary to create it You can create data images from backups or create an empty image with no content in it.
Example 1: Define a data image that mirrors your production instance:
dev-myApp.yaml
sourceType: backup
name: dev
engine: mssql
version: 2022
backups:
  - path: my-backups/backup1.bak
  - path: my-backups/backup2.bak
Example 2: Define a data image that is a completely empty instance:
dev-newApp.yaml
sourceType: empty
name: dev
engine: postgres
version: 15
Creating a data image is as simple as running the following command referencing the yaml file:
rgclone create data-image -f ./dev-myApp.yaml
Common values for data image definition
Data source. String: sourceType
| Name | Value |
|---|---|
| sourceType | backup |
Database engine. String: engine
| Name | Value |
|---|---|
| SQL Server | mssql |
| Oracle | oracle |
| PostgreSQL | postgres |
| MySQL | mysql |
Database engine version. String: version
| Name | Value |
|---|---|
SQL Server 2019 SQL Server 2022 | 2019 |
Oracle 19c Express Edition Oracle 19c Standard Edition Oracle 19c Enterprise Edition | 19-xe |
PostgreSQL 11 PostgreSQL 12 PostgreSQL 13 PostgreSQL 14 PostgreSQL 15 | 11 |
| MySQL 8 | 8 |
Learn more about writing data image definition yaml .
Learn more about working with data images.
Data container
A data container is a running instance of a data image that behaves like a regular database server that you can connect to and work with. Data containers are virtual clones, so they're quick to create and require only a tiny fraction of disk, yet provide access to all databases and data in the original image. From a single data image you can create as many data containers as you want very quickly, all isolated from each other, allowing you and your team members to make changes without worrying about impacting anything else.
Creating a data container is as simple as running the following command referencing the data image:
rgclone create data-container --image dev
Learn more about working with data containers.
Learn more about Redgate Clone commands.
Scaling Redgate Clone
The specifications listed above are designed to help you get started but will only enable you to work with a single data image and a few data containers. As a guide, you will need to consider the following as you increase your usage of Redgate Clone:
| Scaling | More RAM | More storage |
|---|---|---|
More data containers |
| |
More data images | ||
| Larger backups |
Creating more data containers
As each data container is a running instance it requires RAM – the more clones (data containers) you want to run in parallel the more RAM you will need to provision. As Redgate Clone runs as a central service you'll need to factor in the number of users and/or pipeline runs you'll want connecting at the same time.
The tables below shows the default CPU and RAM requirements per database type. If required, these can be configured within the Admin Console.
| RAM usage | MSSQL | PostgreSQL | MySQL | Oracle | ||||
|---|---|---|---|---|---|---|---|---|
| Request | Limit | Request | Limit | Request | Limit | Request | Limit | |
| Data Container (entire lifetime) | 512Mi | 3Gi | 256Mi | 1Gi | 256Mi | 1Gi | 512Mi | 3Gi |
| Data Image (in progress only, freed after creation) | 512Mi | 3Gi | 256Mi | 1Gi | 256Mi | 1Gi | 512Mi | 3Gi |
| CPU usage | MSSQL | PostgreSQL | MySQL | Oracle |
|---|---|---|---|---|
| Data Container (entire lifetime) | 500m | 250m | 250m | 1000m |
| Data Image (in progress only, freed after creation) | 500m | 250m | 250m | 1000m |
Please also see the following FAQs:
- How much RAM does a data image consume and for how long?
- How much RAM does a data container consume and for how long?
Working with larger backups
When working with larger backups, you'll need to adjust the size of the attached disk(s) to provide enough storage for data images and any changes you make to data containers. Only the changes you make to data containers are stored by if you have lot of data containers running and make many changes, this can add up – the key is to treat data containers as ephemeral and small changes and frequently refresh them.
As each data image will be roughly the same size as the original database, the file share must have sufficient disk space available to store them.
For example: you may want to keep a data-image of your current backup while also enabling a data-image to be created of the latest backup when taken. In this example, you will require disks totaling 2x the size of your backup for the data-images, plus additional space for data-containers you create and changes you make to them. In this example, for a 500GB backup you should provision disks totaling 1.5TB.
You can increase storage either vertically (increase the size of the disk(s)) or horizontally (add more disks), and choosing which option is best will depend on your requirements.
Learn how to add more disks.
More information
The following pages provide additional information on installing Redgate Clone, but are geared towards a production rollout:
This documentation contains proprietary information and is protected by copyright law.
Copyright © 2026 Red Gate Software Limited. All rights reserved


